HappyFox- JIRA integration helps you in creating tasks in JIRA from within HappyFox, having two-way sync of tickets updates and JIRA comments and also to view the issue specific fields and other custom fields from JIRA within HappyFox.
Applicable Plans: ❌ Basic ✔️ Team ✔️ Pro ✔️ Enterprise Pro
Note: If your JIRA account is Data Center/Server based, check with JIRA support to confirm whether applications links with Consumer Key (instead of OAuth) are supported in your account.
Supported versions:
Watch a feature walkthrough 📽:
CONTENTS
CONFIGURING JIRA APP
To enable JIRA integration, login to the HappyFox staff panel and install the JIRA app from Apps > Project Management > JIRA.
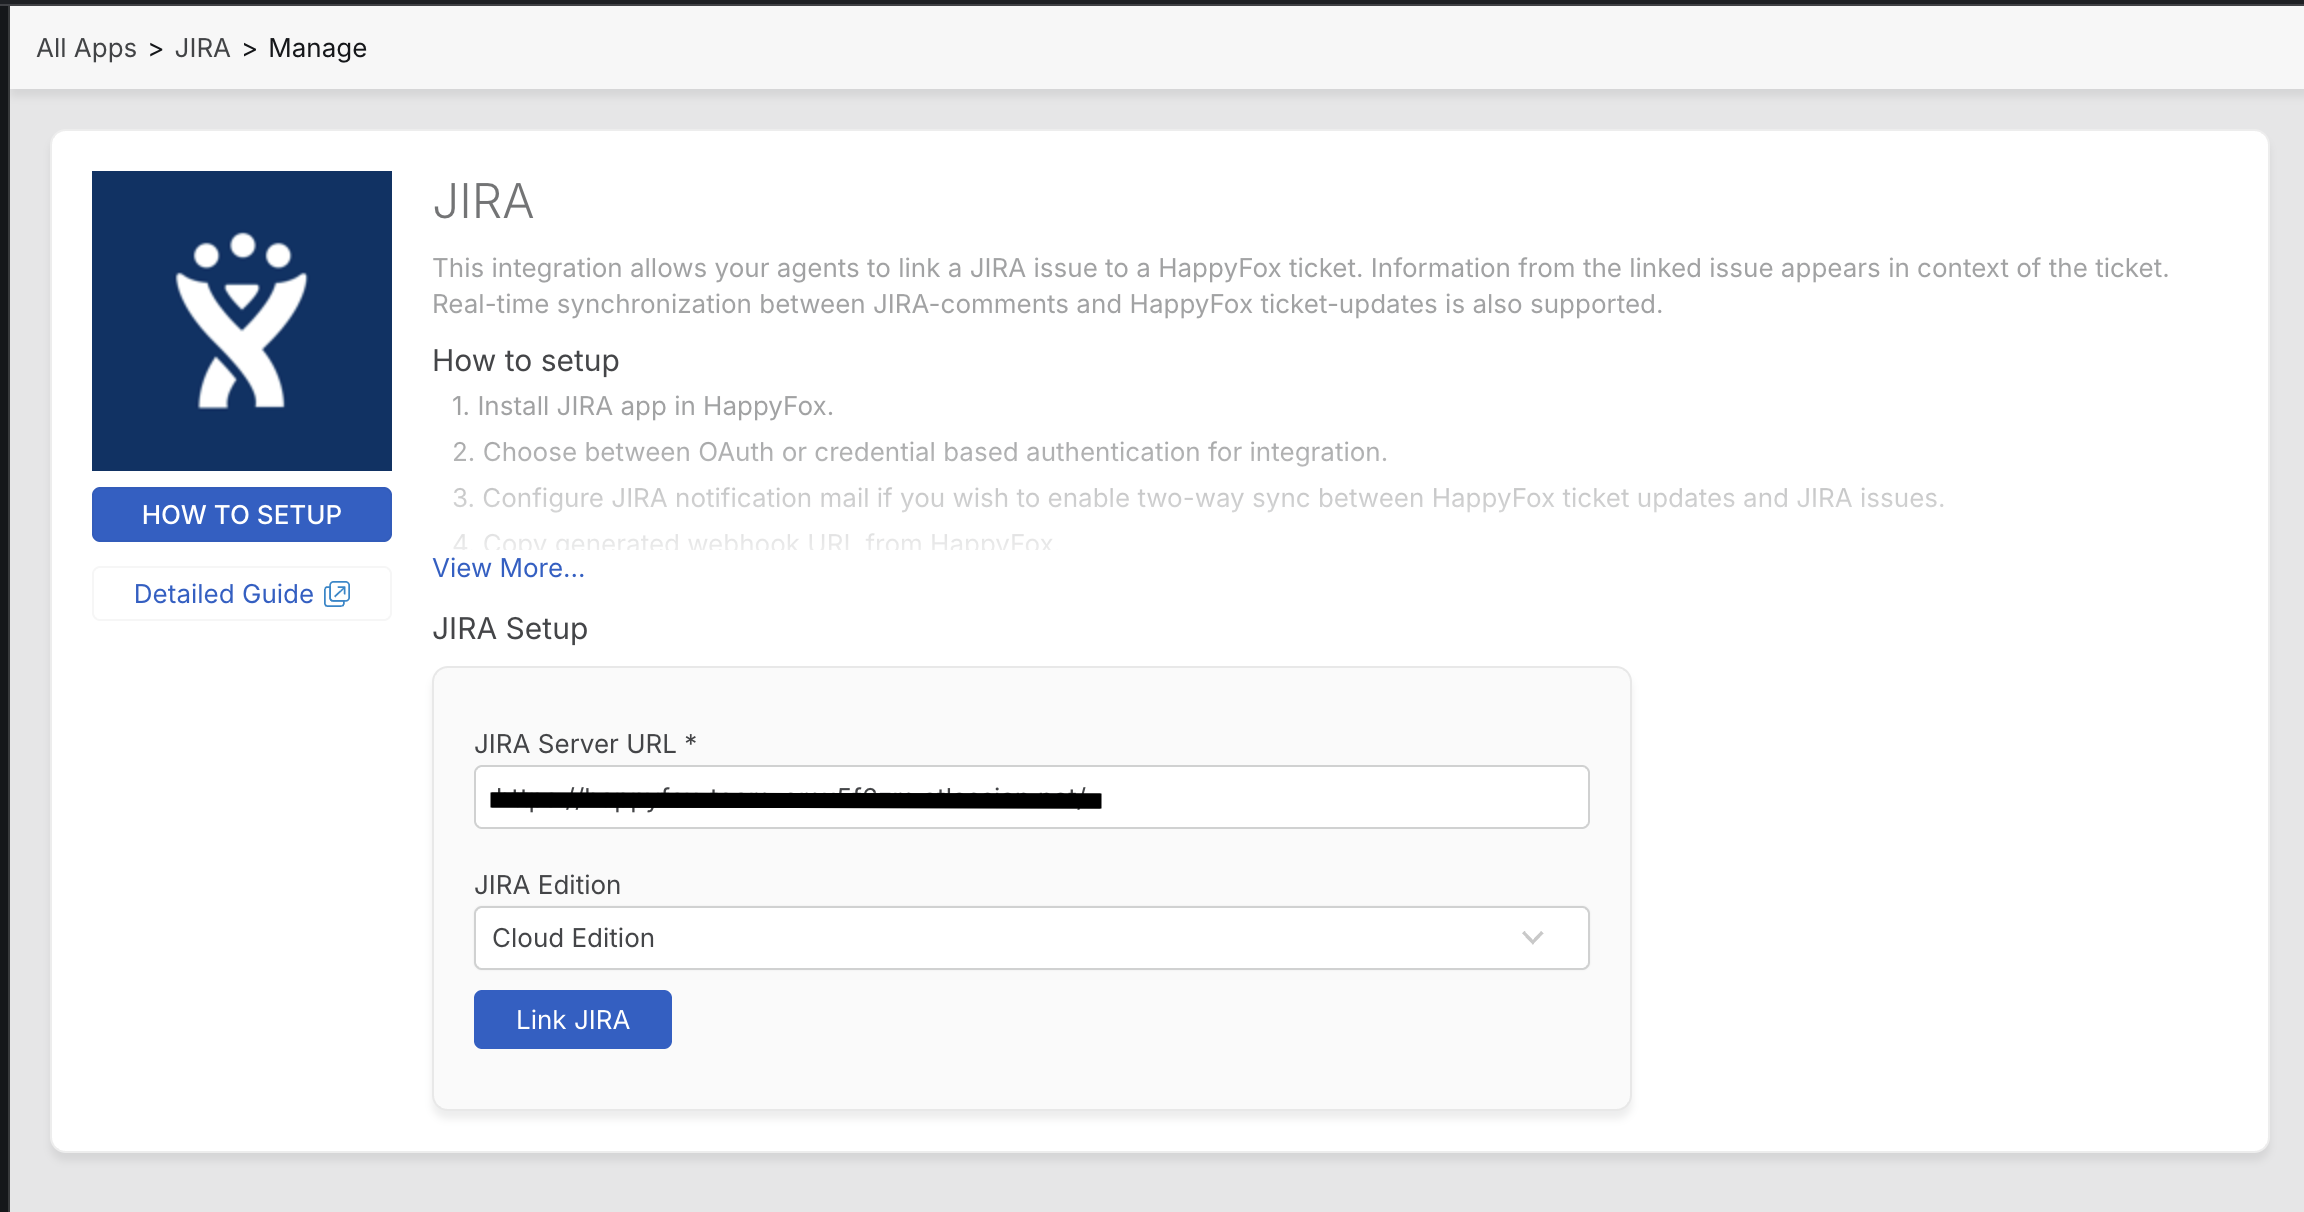
1. Enter your Jira Server URL
2. Authorize your Jira Account according to your Jira edition. (Cloud and Data Center Editions)
2.a Authorizing JIRA for Cloud Edition using OAuth2.0
1. Enter your Jira Server URL and select Jira edition as Cloud
2. On clicking 'Link Jira', you will be redirected to Jira's grant screen with the necessary scopes.
3. Click 'Accept' to authorize the integration.

4. After successful authorization, move on to configuring webhooks from Jira to HappyFox
2.b Authorizing JIRA for Data Center Hosted Edition
Please ensure that pop-ups are enabled in your browser for your HappyFox domain before proceeding.
Configuring Application Links from HappyFox to JIRA
- In Jira, go to Settings → Jira Apps → Integrations → Application Links.
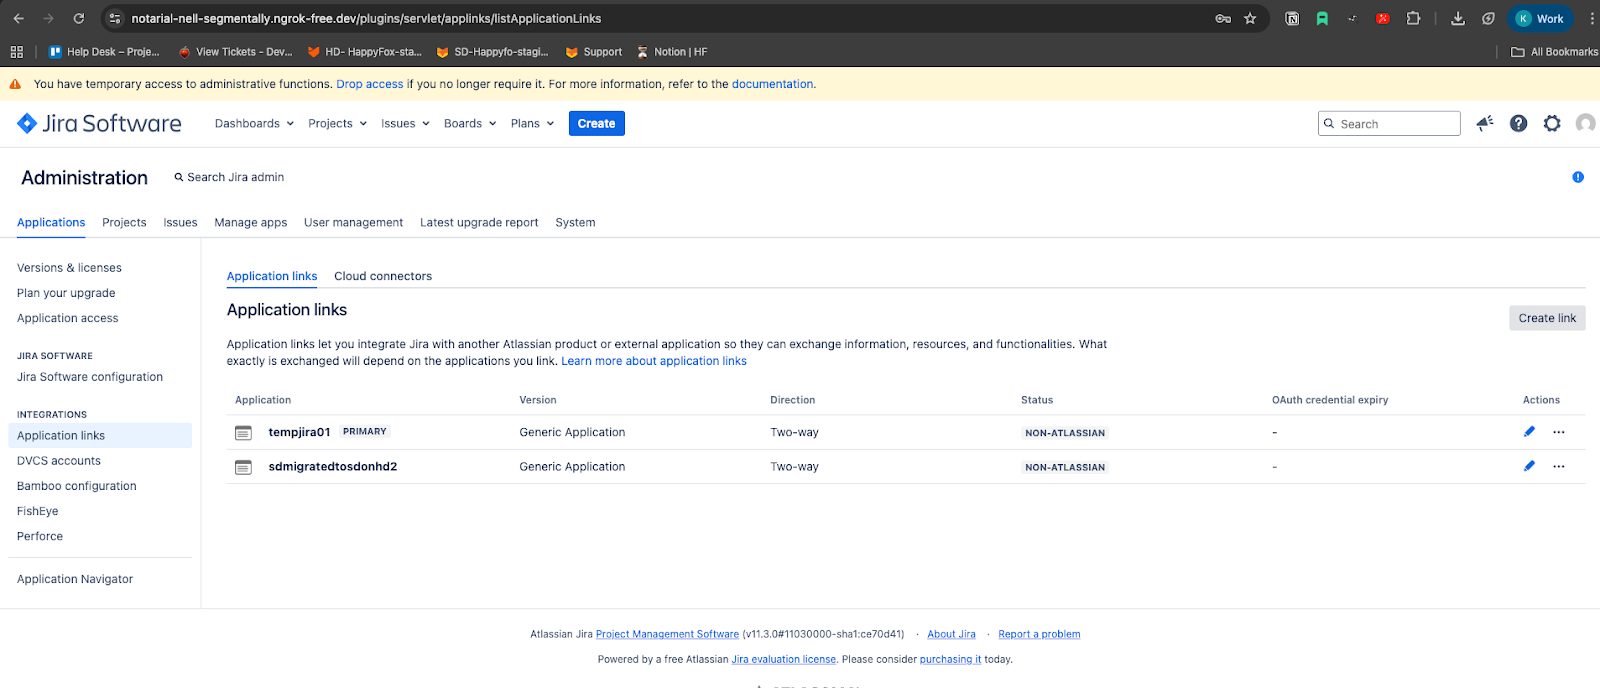
- Click Create Link.
- Fill in the following:
- Name: any identifiable name
- Redirect URL: copy this from the HappyFox Jira App Manage page
- Scope: set this to Write
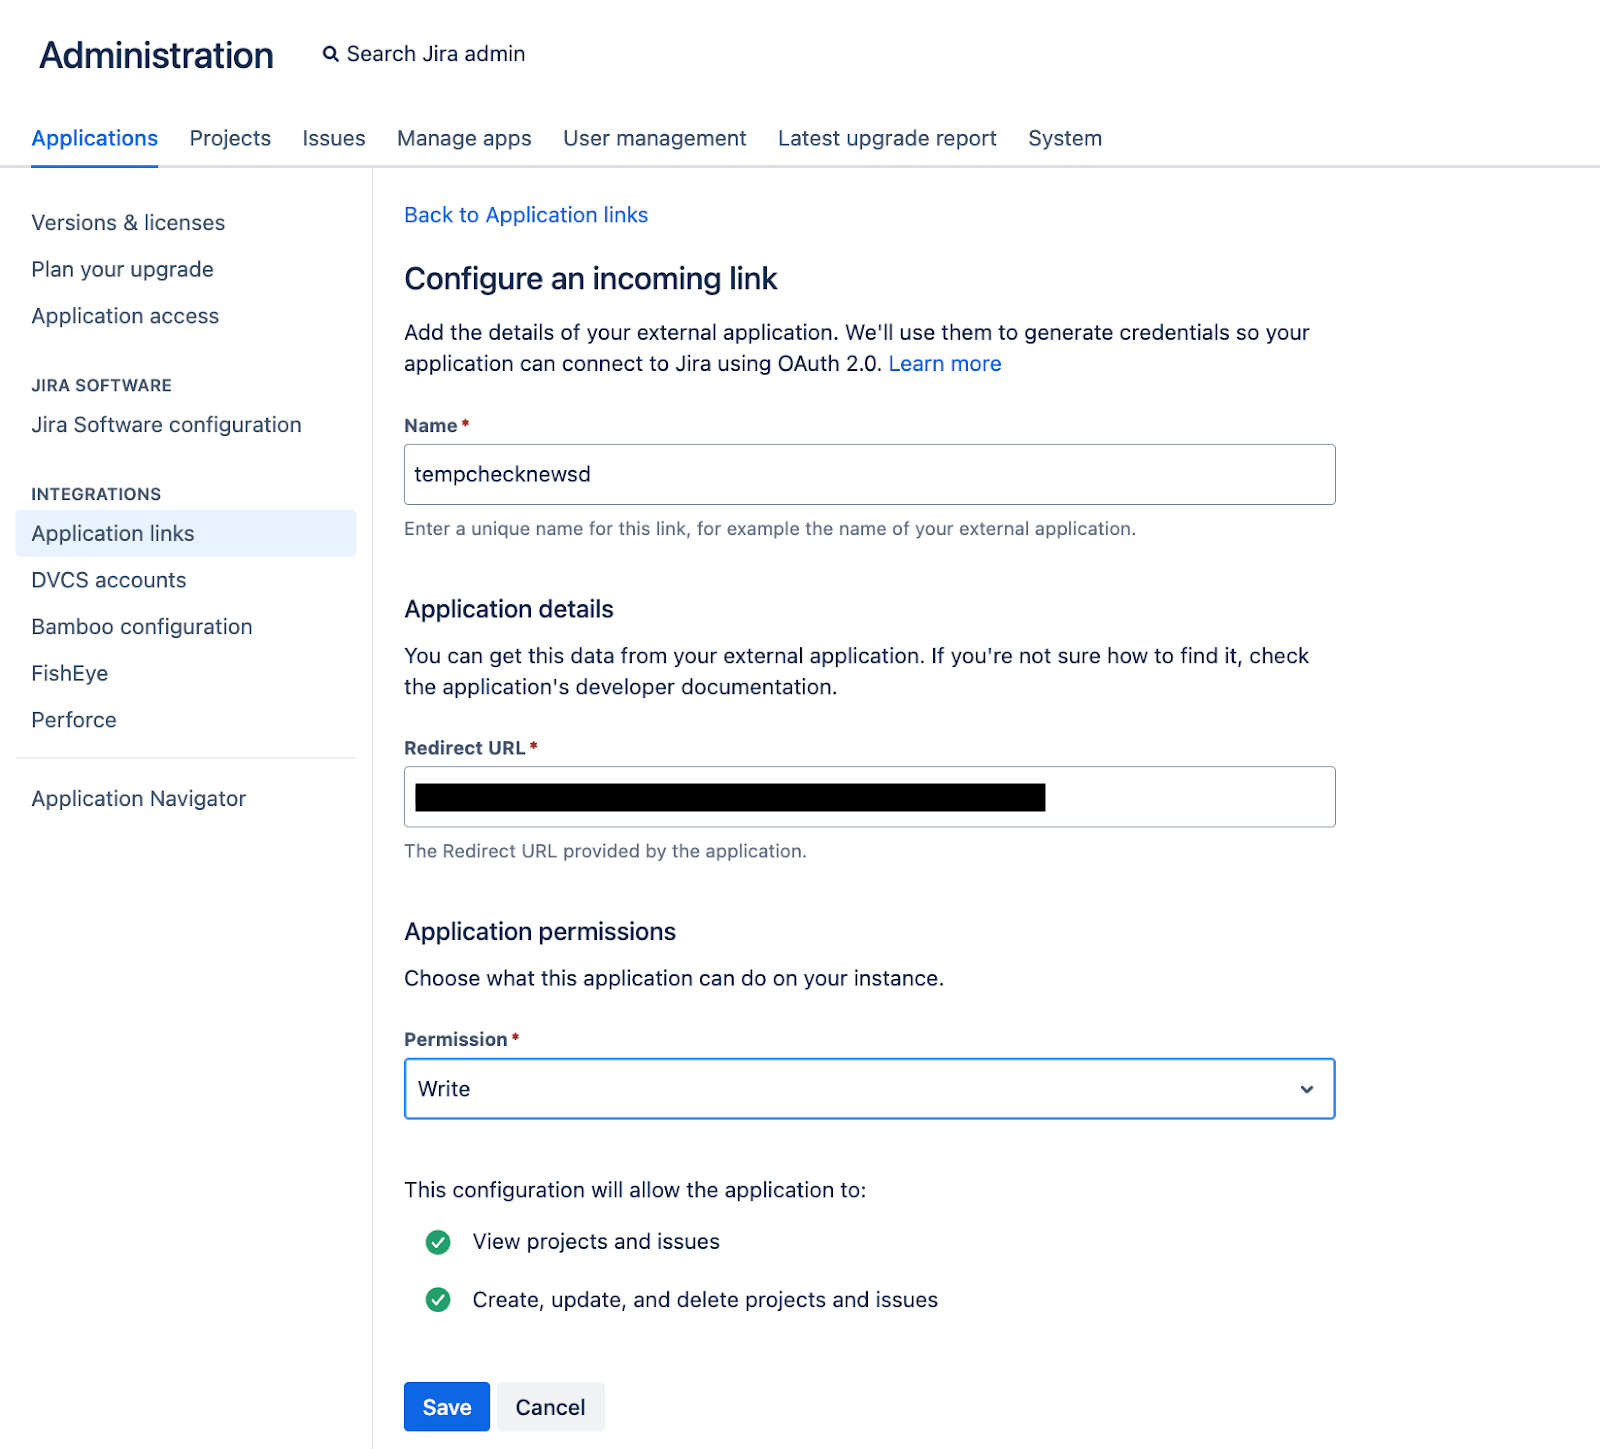
- Name: any identifiable name
- Click Save.
- Jira will now display the Client ID and Client Secret. Copy both values.

- Return to the Jira App Manage page inside HappyFox and paste the Client ID and Client Secret into the corresponding fields. Then click Link Jira.

- You will be redirected to the Grant Access screen in Jira. Click Allow to authorize.
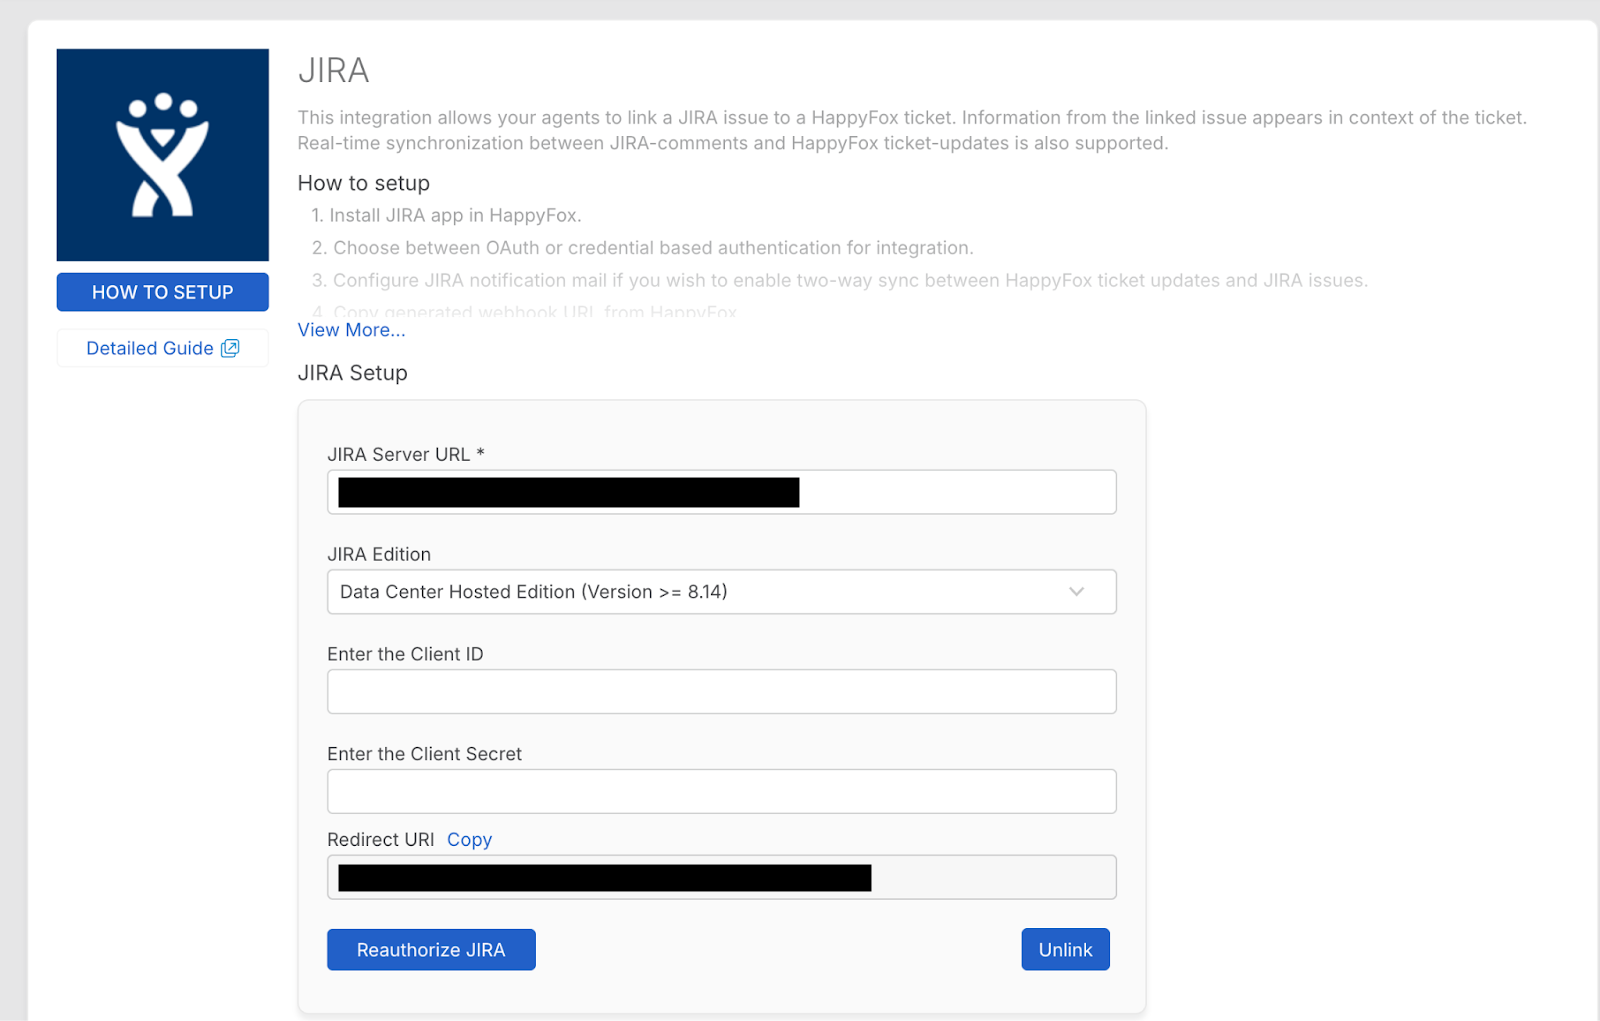
- Your Jira Data Center integration will now be fully connected using OAuth 2.0.
- Your JIRA integration will be automatically enabled.
Email Notifications for JIRA Sync Notes
To receive email notifications when a new JIRA sync note is added, click on 'Enable email notifications for JIRA Sync notes' and customize Email Subject and Email Content, based on your requirement and click 'Save Settings'. This email will be sent to all the subscribers of the ticket.

Post-Installation Configuration
Once the settings have been saved successfully, you will have to add a WebHook in JIRA, as shown in the screenshots below. This is required for syncing the comments from JIRA to your HappyFox account.
Configuring Webhooks from JIRA to HappyFox
1. Copy the Webhook URL from HappyFox JIRA app.

Note: For HappyFox accounts with a custom domain if comments from JIRA do not sync to HappyFox, check webhook url and if it contains custom domain, please change it back to HappyFox domain and then retry.
Eg.
HappyFox account url: https://testdemofox.happyfox.com
Custom domain: https://reachout.testdemofox.com
Webhook url with custom domain:
https://reachout.testdemofox.com/staff/jira/<runtime_id>/event_webhook/?issue_id=${issue.id}
Webhook url with HappyFox domain:
https://testdemofox.happyfox.com/staff/jira/<runtime_id>/event_webhook/?issue_id=${issue.id}
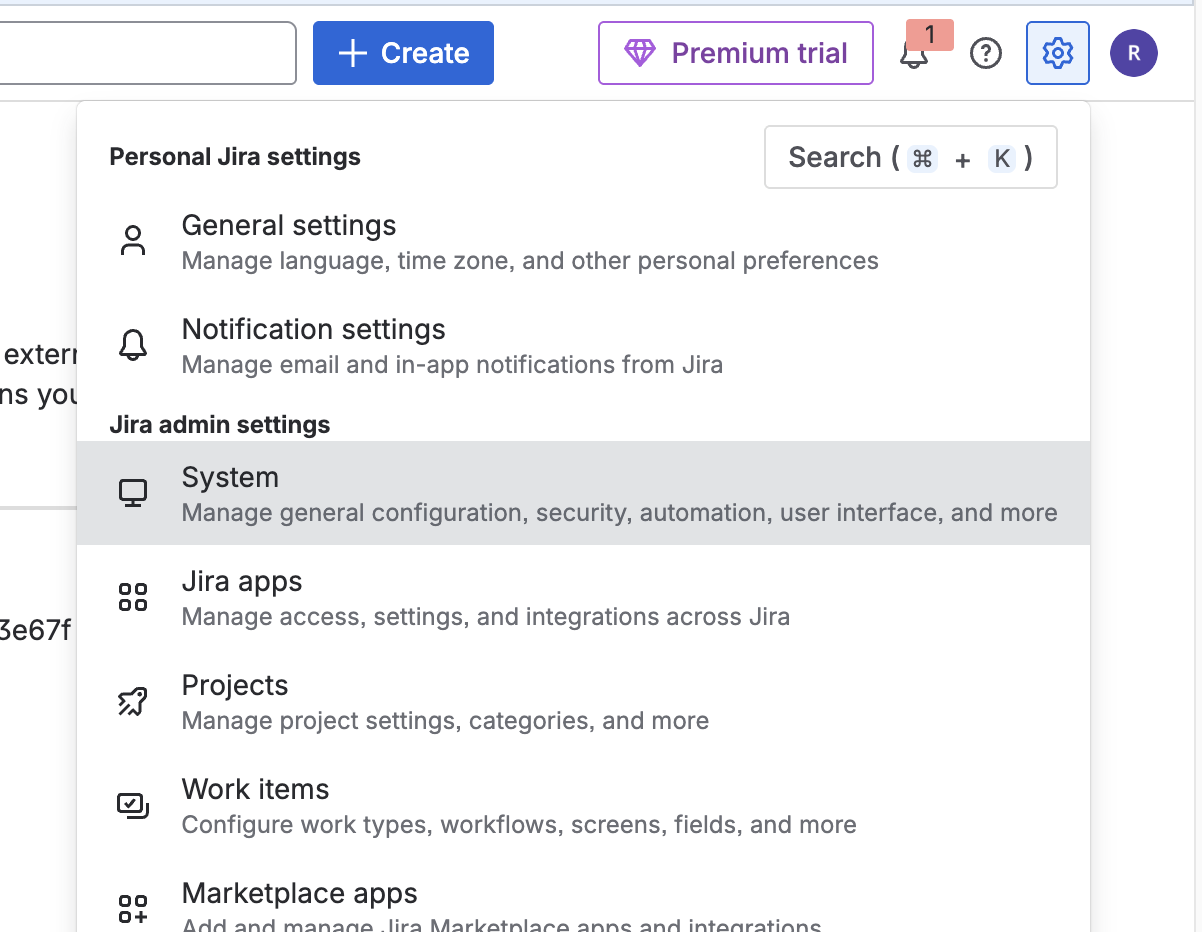
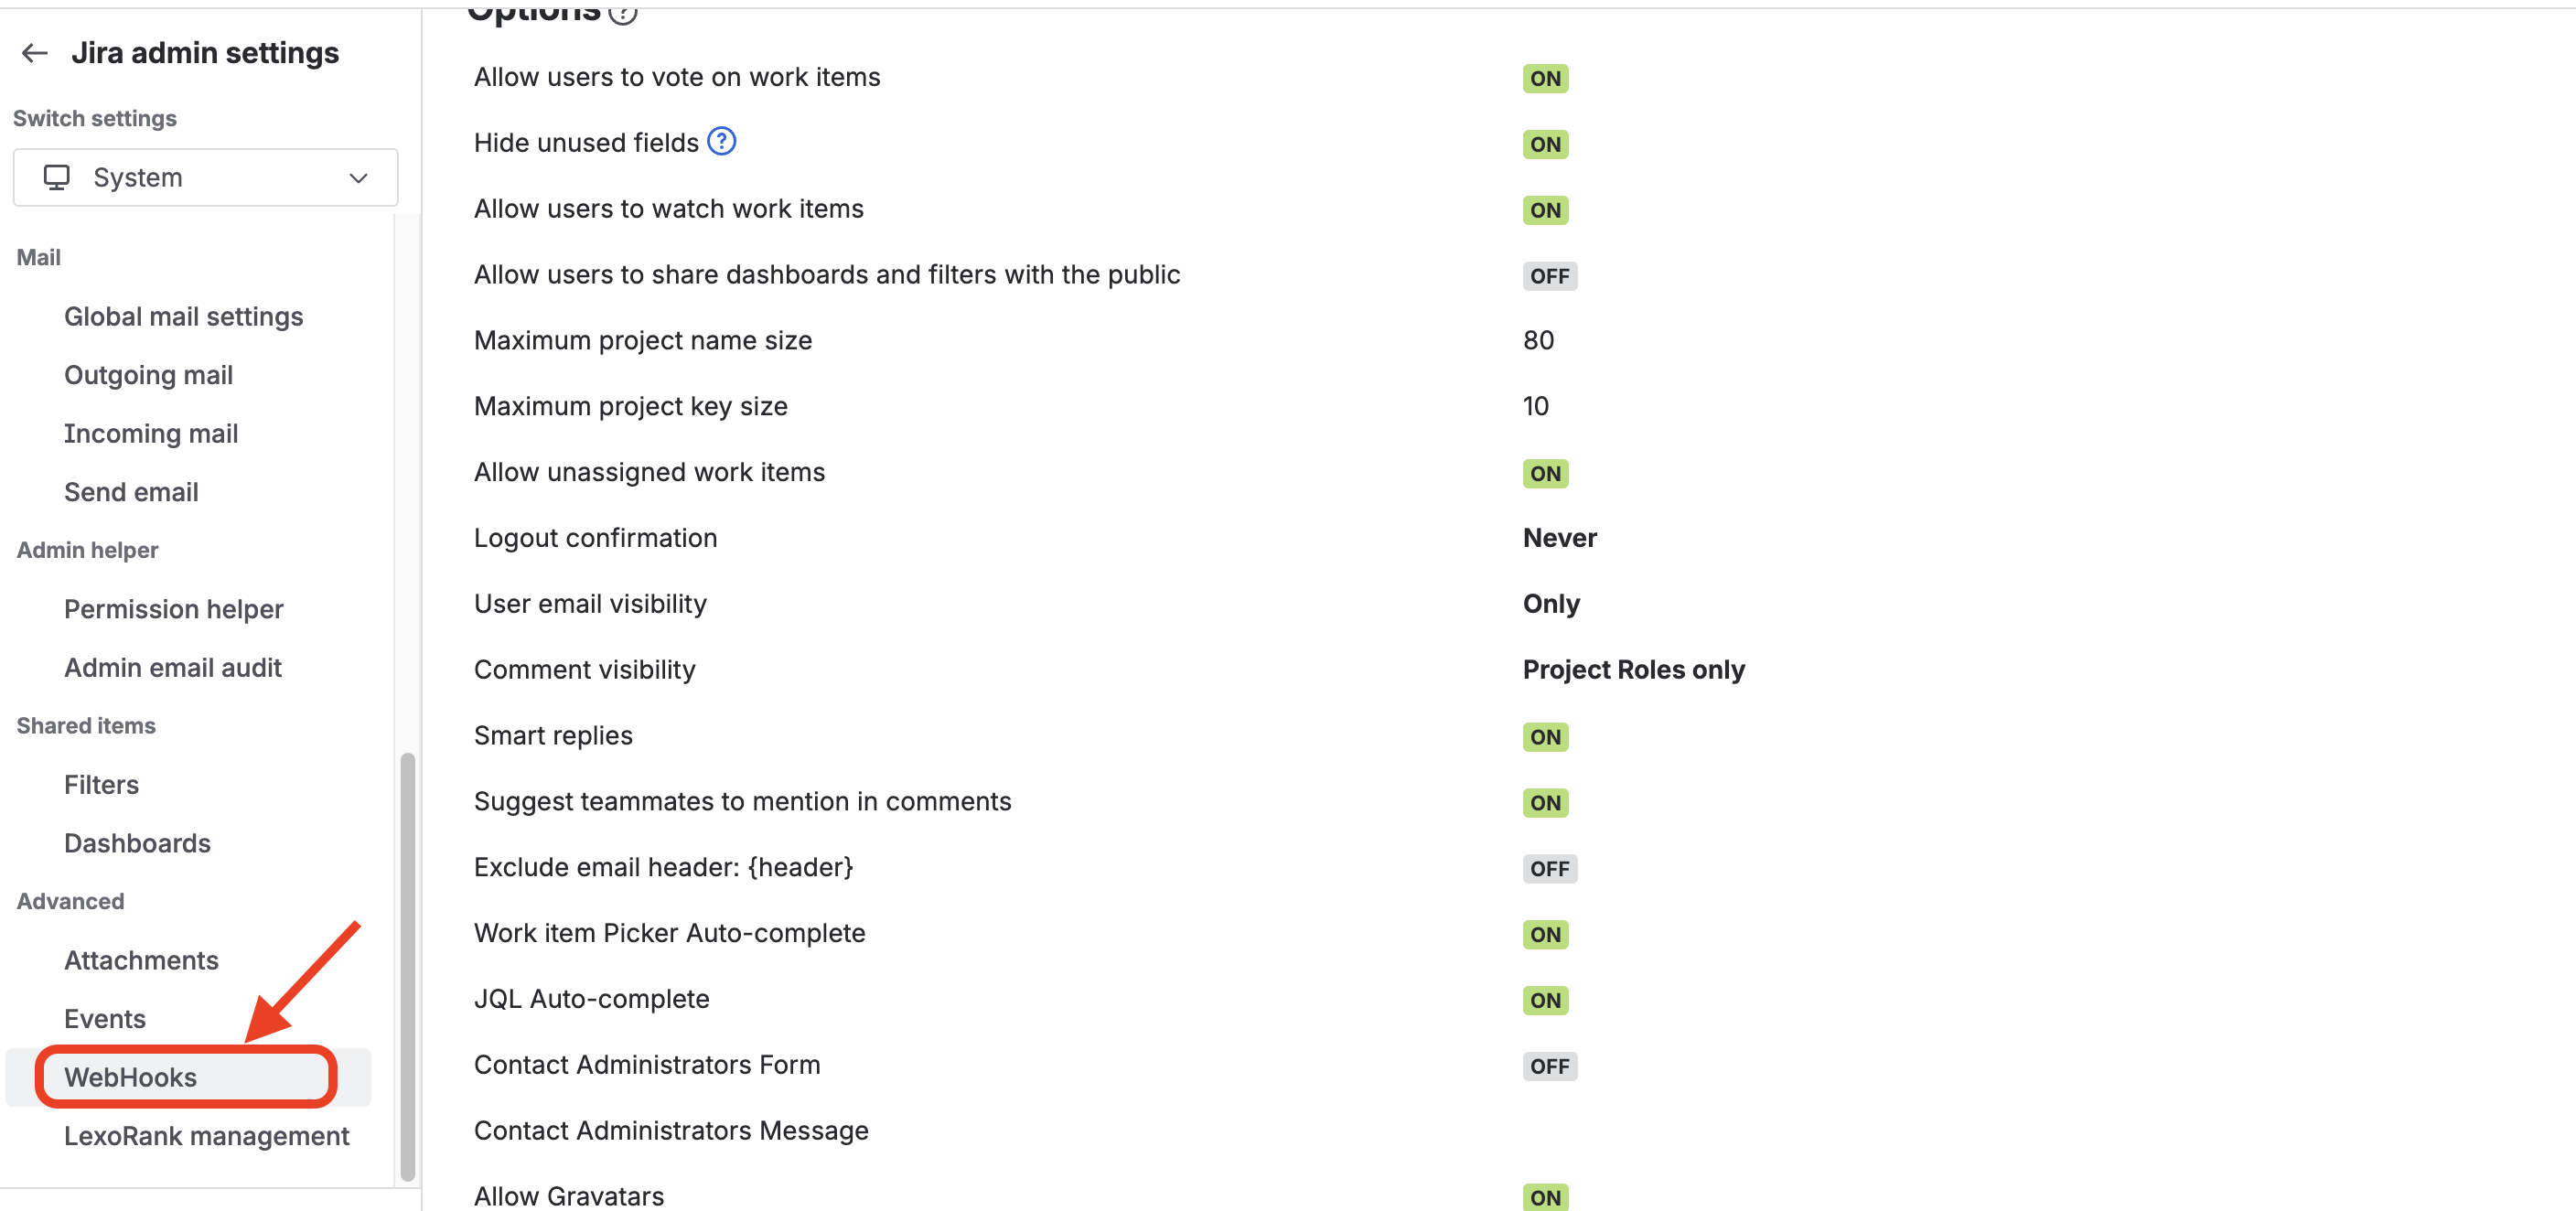
2. Switch to JIRA. Navigate to Settings >> System >> WebHooks.
3. Click on "Create a WebHook" and paste the WebHook URL that you had copied from HappyFox. Ensure that all issue related events are selected as shown below.
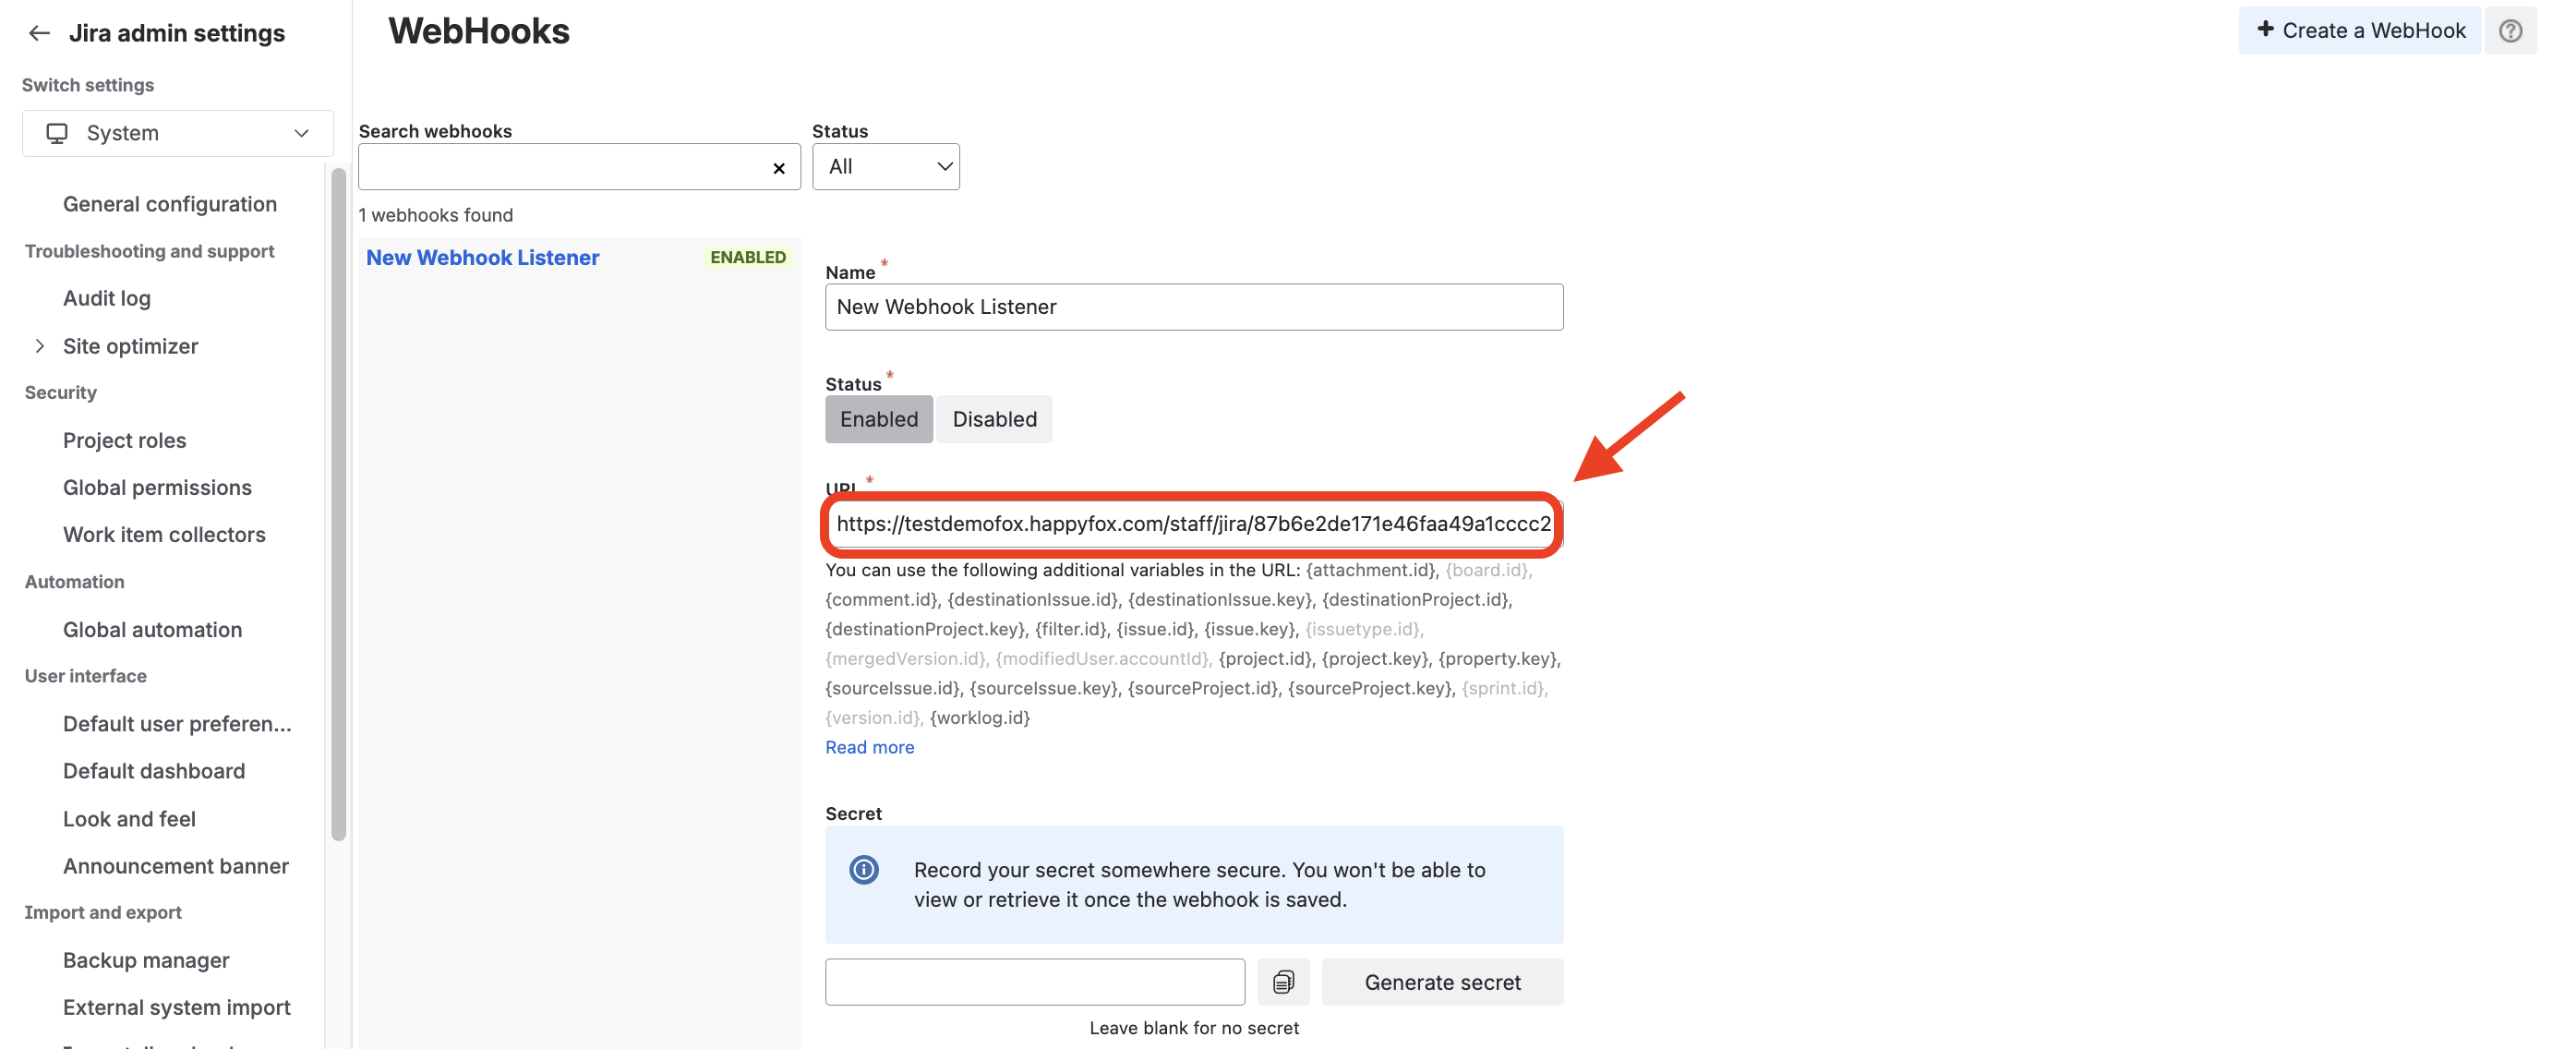
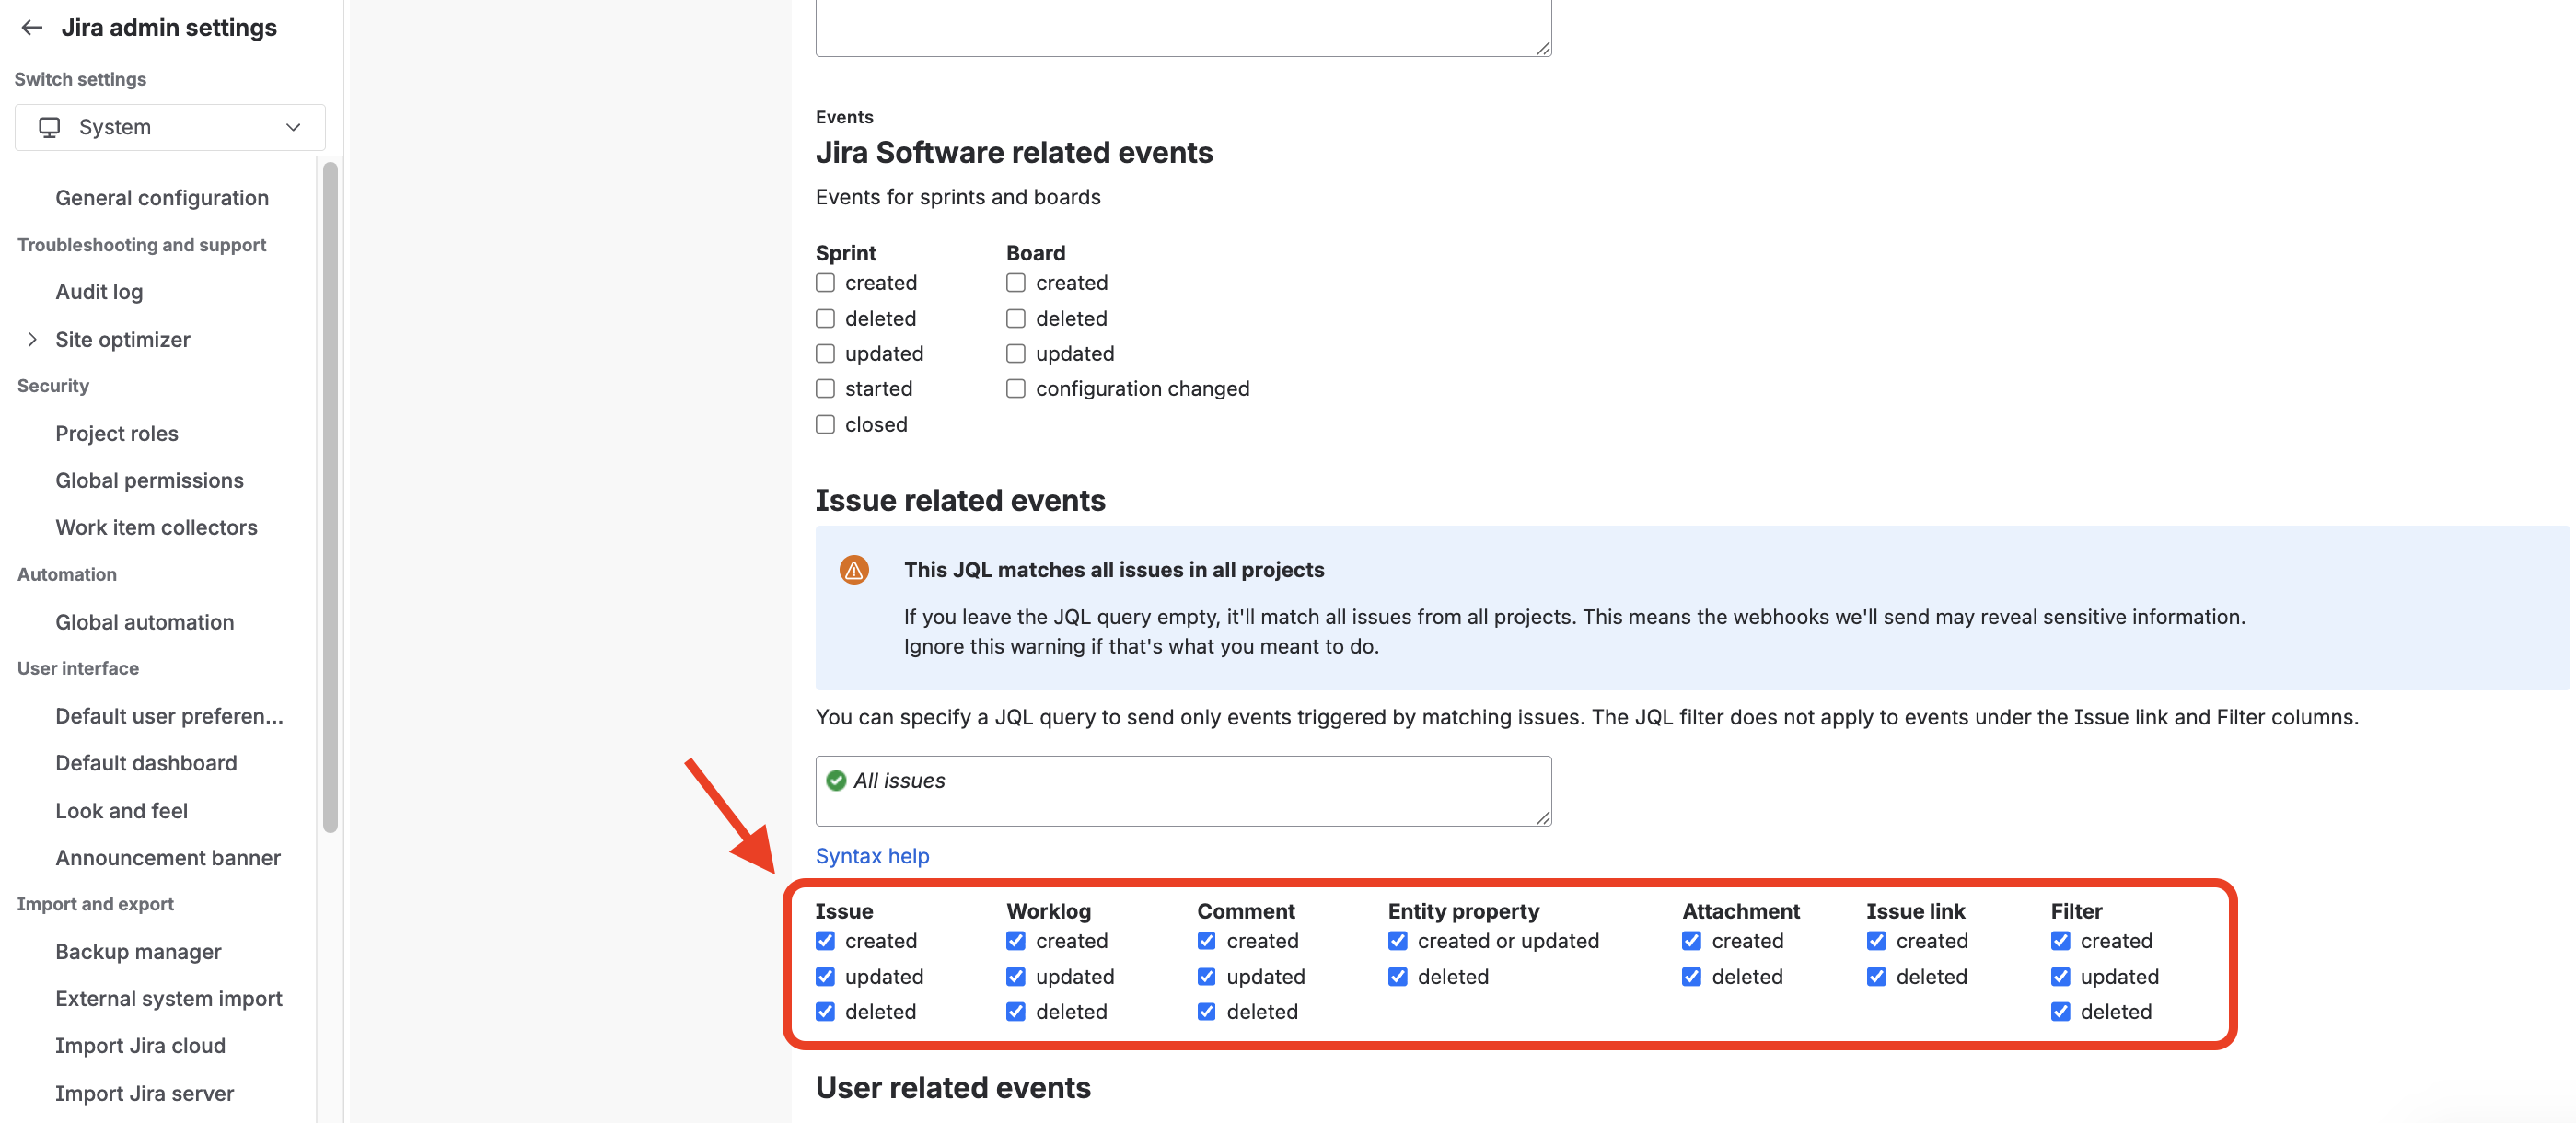
Important Note: Please ensure "Exclude Body" is unchecked in this configuration

INTEGRATION WITH HAPPYFOX TICKETS
Once the JIRA integration has been set up, there will be a new section shown on the Ticket detail page in HappyFox. Example of the section, when no JIRA task is associated with the ticket is shown in the screenshot below.

Creating/Linking JIRA Task from HappyFox
To create a new task in JIRA from a ticket in HappyFox, the permission Create & Edit JIRA issues should be enabled in the Staff >> Roles section for the logged in staff.
To add an issue, click on the "add new" link and this will open a sidebar with details like Project name, issue type, custom fields etc from your JIRA account. HappyFox also provides the following options, which you can optionally check.
-
Sync comments from JIRA
-
Close the ticket when the JIRA task is closed

Also, you can link the ticket to an existing task in JIRA by entering the JIRA Issue Key.

Where can I find the JIRA Issue key/ Issue ID?

Syncing JIRA comments as Ticket Updates
Comments which are synced from the JIRA task will be shown in HappyFox as shown below. the update is shown as a "JIRA Update" with the blue band (JIRA sync) indicating that this update in the ticket was from JIRA.

Comments sync from JIRA will be pushed to the HappyFox account only if SSL is enabled on your HappyFox account.
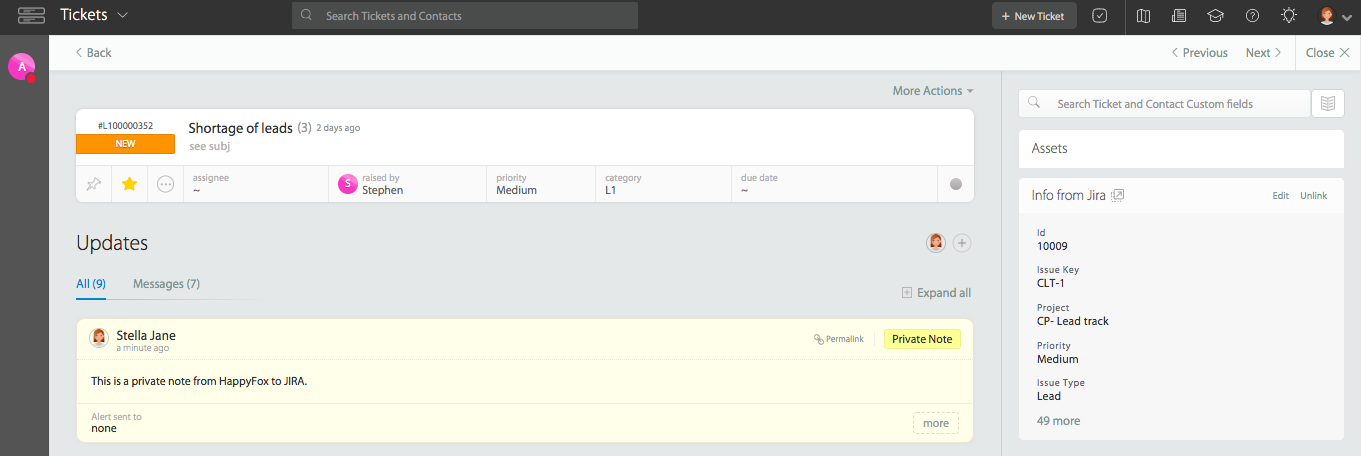
Viewing Information from JIRA on Tickets
Other information from JIRA, about the specific issue like the other custom fields data, is shown in the Information from JIRA section. You can click on More info to view this data. The edit functionality will open a sidebar in HappyFox to edit the basic information for the JIRA task (not all fields are supported). The options to sync updates and close the ticket will be present, in case this setting has to be changed from before, while the task was initially created.
You can also click on "view in JIRA" icon to view the task fully in JIRA.

Viewing Information from HappyFox on JIRA
Private notes and replies from HappyFox reflect as comments against the corresponding issues in JIRA.
Details about the agent (Name, Email) responsible for the note/reply are included within the JIRA comment.
For example, Let's add a private note on HappyFox:
On JIRA, the private note will reflect as a comment:

With status sync, HappyFox lets you do a HappyFox to JIRA and/or JIRA to HappyFox status sync.
- Once you enable the "Status Sync" toggle, the agent can choose to sync one way or two ways as shown below.
- Agents can then map HappyFox statuses with the JIRA status as desired.

Once this is done, you would start seeing the status sync. For example, if you have enabled two-way sync below example explains how the sync would work.
- When your support reps change the ticket status to "Reopened" in HappyFox, you can map this status with your JIRA issue status"Re-open". This way anytime a bug is responded, your respective JIRA issue is updated instantly and your engineering team is aware of the same.
- Same way, Once your engineering team can work on the issue and move the status to "Fixed". This can be mapped to your HappyFox status for example "Solved". This way, the support rep now knows the bug is fixed and he can indicate the same to the customer.
On enabling assignee sync
- When an assignee is changed in HappyFox ticket to for example [email protected] , then the JIRA issue linked to this ticket will also have the assignee changed to [email protected] if the same user is present in both HappyFox and JIRA with the same email ID.
- Similarly, if the JIRA issue is reassigned to [email protected] in JIRA, then the HappyFox support ticket linked to this JIRA issue will have assignee automatically reassigned to [email protected] if the agent is present in HappyFox as well with the same email ID.

If you are have the JIRA issue linked to multiple HappyFox tickets, unassigning the JIRA issue will unassign all the related HappyFox tickets. We recommend to keep the assignee sync turned ON only if unassiging the HappyFox ticket on JIRA assignee update is the expected result you are trying to achieve.
Under Assignee Sync - there is a JIRA side of things to check. To ensure ‘Assignee Sync’ works as expected. Please do the below steps:
- Navigate to https://id.atlassian.com/manage-profile/profile-and-visibility
- Scroll down to the ‘email address’ section.
- Ensure that the visibility section has the option ‘Public’ or ‘Anyone’ selected.
On enabling attachment sync
- Attachments added within HappyFox ticket replies/notes will be synced with the JIRA issue that is linked to the HappyFox ticket.
- Similarly, any attachment added in JIRA Issue comments will also be synced back to HappyFox as JIRA Sync Notes with the attachments added.
Attachments present in customer updates are not synced to JIRA Issues.
Quick Tip:
If you are not seeing the "Save Settings" option and getting an error message while trying to connect your JIRA account to HappyFox Helpdesk, please follow these steps:
- In the HappyFox Helpdesk, navigate to Apps > JIRA > Manage.
- Click the 'Change' link under the JIRA Setup section.
- In the JIRA Server URL field, add a trailing slash (/) to the existing URL if it doesn't already have one, or remove the trailing slash if it does.
- Click 'Save'.
- A dialog should appear prompting you to allow permissions for HappyFox. Click the 'Allow' button on the dialogue.
By following these steps, you should be able to resolve the error and successfully connect your JIRA account to HappyFox Helpdesk.