HappyFox supports SAML-based single sign-on with popular identity providers such as OneLogin, Okta, or a custom SAML provider of your choice. This is available on the all plans. HappyFox also supports single sign-on through a self-hosted Active Directory Federation Services (ADFS) server on your own network. ADFS is a standard Windows Server role from Microsoft that provides a web-based login for users in Active Directory.
Once this is configured, both your end users (customers) and staff (agents) can sign in to their respective HappyFox panels using their Active Directory credentials. (If ADFS is already set up, skip ahead to Configuring ADFS for staff and end user authentication below.)
Important: the account used in this article — acmewidgetsco (acmewidgetsco.happyfox.com) — is a test account for reference only. Replace it with your own HappyFox account name throughout.
Requirements
- An Active Directory instance where user accounts have an email address attribute
- A HappyFox account on one of the plans mentioned above
- A server running Microsoft Server 2012 or 2012 R2
- An SSL certificate to sign your ADFS login page, along with its fingerprint
Installing and configuring ADFS on your Windows Server
If you haven’t already installed and configured ADFS and Active Directory, start here. See this article for detailed setup instructions.
Once ADFS is fully installed, note the value of the ‘SAML 2.0/WS-Federation’ URL under ADFS Endpoints. If you used the default installation settings, this will be /adfs/ls/.
Adding a relying party trust
Open the AD FS Management console and select Add Relying Party Trust from the right-hand pane.

A wizard will open. Select Start to begin adding the relying party trust.

1. On the next screen, select Enter data about the relying party manually, then select Next.

2. Enter a display name that you’ll be able to recognize later, then select Next.

3. On the next screen, select the AD FS profile option, then select Next.

4. Leave the certificate settings at their defaults and select Next.

5. Select the checkbox labeled Enable support for the SAML 2.0 WebSSO protocol. Set the service URL to https://<accountname>.happyfox.com/staff/saml/callback, replacing <accountname> with your HappyFox subdomain. There should be no trailing slash at the end of the URL.
Notes:
1. If you’re using more than one SAML integration in HappyFox, the ACS callback URL for a custom SAML setup should behttps://<accountname>.happyfox.com/saml/custom-saml/callback/orhttps://<accountname>.happyfox.com/staff/saml/custom-saml/callback/.
2. If you’re using a custom domain for your HappyFox help desk, include the ACS URL in both the custom domain format and the default HappyFox URL format.
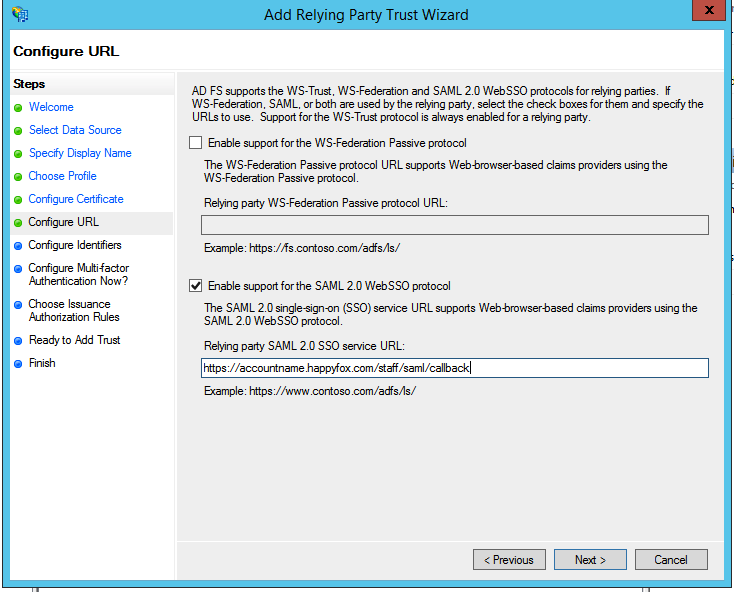
6. Add a relying party trust identifier of https://<accountname>.happyfox.com/saml/metadata, replacing <accountname> with your HappyFox account name, then select Next.

7. The next screen lets you configure multi-factor authentication, which isn’t covered in this article. Select I do not want to configure multi-factor authentication settings for this relying party trust at this time, then select Next.

8. Select Permit all users to access this relying party, then select Next.

9. The next two screens summarize your settings. On the final screen, select Close to exit and open the Claim Rules editor.

Configuring ADFS for staff and end user authentication
Complete the following steps if you want staff and end users to authenticate through ADFS on HappyFox.
1. Double-click the relying party trust you just created. On the Identifiers tab, add a second relying party identifier with the value https://<accountname>.happyfox.com/saml/client-metadata/.

2. On the Endpoints tab, select Add SAML at the bottom and enter the following values, as shown below:

Endpoint type: SAML Assertion Consumer
Binding: POST
Index: 1
Trusted URL: https://acmewidgetsco.happyfox.com/saml/callback/
Select OK to save the new endpoint. The Endpoints tab should look like the screenshot below once it’s been added.

That’s it — your end users and staff can now sign in to their respective HappyFox accounts automatically when logging in through the ADFS homepage.
Note: if the same email address exists in a HappyFox account as both a customer and a staff member, the staff account takes precedence and the user is redirected to the staff panel.
Creating claim rules
You’ll now need to set up claim rules for this relying party trust. By default, the claim rule editor opens automatically once the trust has been created.

1. Select Add Rule, choose the Send LDAP Attributes as Claims template, then select Next.

2. On the next screen, using Active Directory as your attribute store:
1. Under LDAP Attribute, select E-Mail-Addresses.
2. Under Outgoing Claim Type, select E-Mail Address.

3. Select OK to save the rule.
4. Select Add Rule again, this time choosing the Transform an Incoming Claim template.

5. On the next screen:
1. Set Incoming claim type to E-Mail Address.
2. Set Outgoing claim type to Name ID.
3. Set Outgoing name ID format to Email.
Leave the rule set to the default of Pass through all claim values.

6. Select OK to create the claim rule, then OK again to finish.
Setting up the full name claim
If end users will also authenticate through ADFS, you’ll need an additional claim rule to pass their name from Active Directory into HappyFox as the contact’s name.
To pass the user’s full name, create a rule using the Send LDAP Attributes as Claims template:
- Add a row for the Surname LDAP attribute and a row for the Given-Name LDAP attribute.
- For the outgoing claim type, select Surname and Given Name respectively.

Adjusting the trust settings
A few more settings need adjusting. Select the relying party trust, then choose Properties from the Actions sidebar.

1. On the Advanced tab, set the secure hash algorithm to SHA-256 or SHA-1 — HappyFox supports both.

2. Confirm there’s an entry on the Endpoints tab, as shown below. This is added automatically.
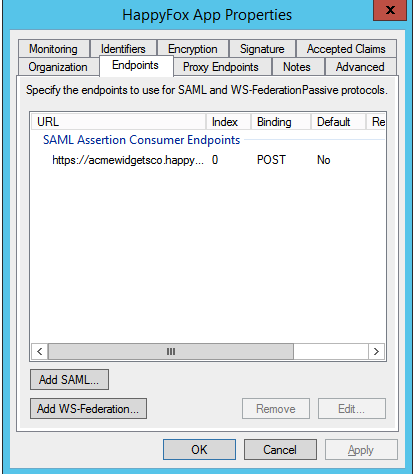

3. Select OK on the endpoint and on the relying party trust properties to confirm your changes. You should now have a working relying party trust for HappyFox.
Configuring your HappyFox account
- Sign in to your HappyFox staff panel (
https://<accountname>.happyfox.com/staff) and go to Apps >> Single Sign-On >> Custom SAML method. - Set SAML Integration Active to Yes.
- Select Custom SAML Method from the Choose SSO provider dropdown.
- Enter the SSO target URL. This will look similar to
https://win-fepfiqek9mi.happyfox.co/adfs/ls— your ADFS domain name followed by the default endpoint,/adfs/ls. - Paste the IdP signature into the box provided.

Once you’ve done this, save the form. This completes the single sign-on setup between HappyFox and ADFS — your staff can now sign in to HappyFox from their local domain sign-in page using their Active Directory credentials.

Troubleshooting
- Keeping server time in sync: a mismatch between the originating server’s clock and NTP time can sometimes cause errors. HappyFox servers run on UTC and stay in sync with NTP. We recommend keeping your own servers synced to a remote NTP server as well. If you continue to run into issues, you can widen the allowed time gap by running the following command in PowerShell and then restarting ADFS:
Set-ADFSRelyingPartyTrust -TargetIdentifier "<relying party identifier>" -NotBeforeSkew 5 - Token signing certificate: in some cases, the certificate used to sign requests from the ADFS server is configured incorrectly — a self-signed certificate ends up set as Primary instead of the valid SSL certificate configured on your ADFS domain. If this happens, you can change the Primary certificate under ADFS >> Service >> Certificates, as shown below:
Updating the IdP signature

In the ADFS console, go to Services >> Certificates to find the Token Signing certificate. HappyFox needs this certificate in PEM format, pasted into the IdP Signature field below the SSO Target URL setting. To export it in the right format: select View Certificate, open the Details tab, then select Copy to File. In the export wizard, choose the Base-64 encoded X.509 format, and make sure you select the primary certificate file, not the secondary one.
Open the exported file in a text editor and paste its contents into Manage >> Integration >> SAML >> IdP Signature, as shown in the screenshot below.