
 26643
26643
HappyFox - Salesforce integration allows agents to view the following information inside the Ticket Details page and the New Ticket Creation form:
-
Standard Salesforce objects such as Accounts, Opportunities, Contacts, and Leads.
-
Other Salesforce objects including out of the box and custom objects that you choose.
You can further customize the visibility of individual fields present inside each of the above objects. Creating Salesforce case records upon creating HappyFox tickets is also supported.
Prerequisites:
Please ensure that API access is enabled for your Salesforce Account. Check out Salesforce editions with API access here.
How Salesforce integration works:
-
The Salesforce app compares the HappyFox ticket contact's email address with the corresponding Lead(s)/contact(s) inside your Salesforce account, and if there is an exact match, fetches the contact(s)/lead(s) details from Salesforce.
-
Direct Account for the Contacts from step 1 is fetched from Salesforce.
-
Opportunity(ies) that are linked to the account(s) from step 2 are fetched from Salesforce.
-
If there is a matching contact in HappyFox and Salesforce, ticket updates from HappyFox are pushed into Salesforce as new cases listed against the contact - This is only for ticket updates that are recorded after the below toggle is turned ON from the Salesforce app page in HappyFox.

While configuring the app, if you have selected any additional objects, they will also be shown. They are fetched from Salesforce if they have a lookup association to:
- exactly a single contact (Priority).
- or a single account.
If multiple contacts are associated, the app proceeds to look for a single account association and vice-versa. If Multiple Contact AND Account association are present, results for those additional objects are not fetched.
-
Once configured, you can modify the visibility of each of these objects inside HappyFox. Results for these objects are shown in the ticket-detail page and in new-ticket form.
Available on Fantastic and above pricing plans.
Quick Setup Video:
Integrating Salesforce with HappyFox require the following:
Getting Customer Key and Customer Secret from Salesforce:
1. Go to your Salesforce account. Navigate to the Setup page.

2. In the menu bar on the left pane, please go to Apps and select App Manager. Create a New External Client App.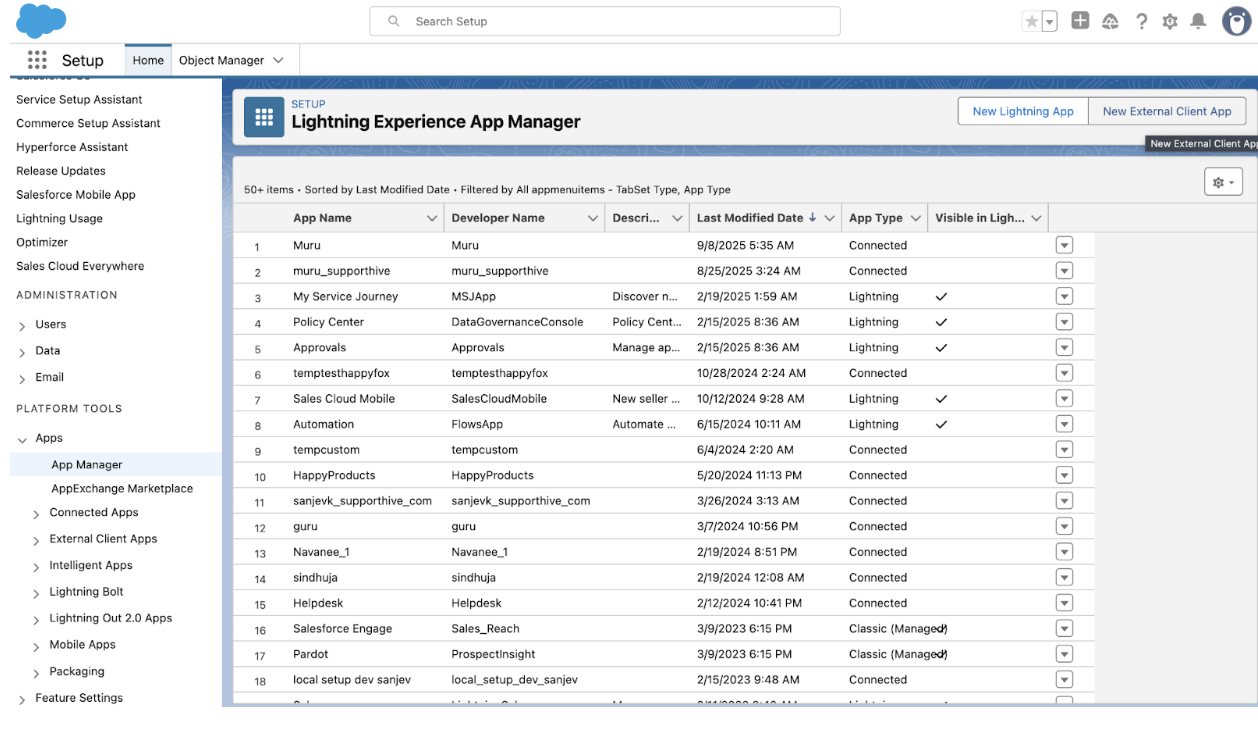
3. Fill in the required information.

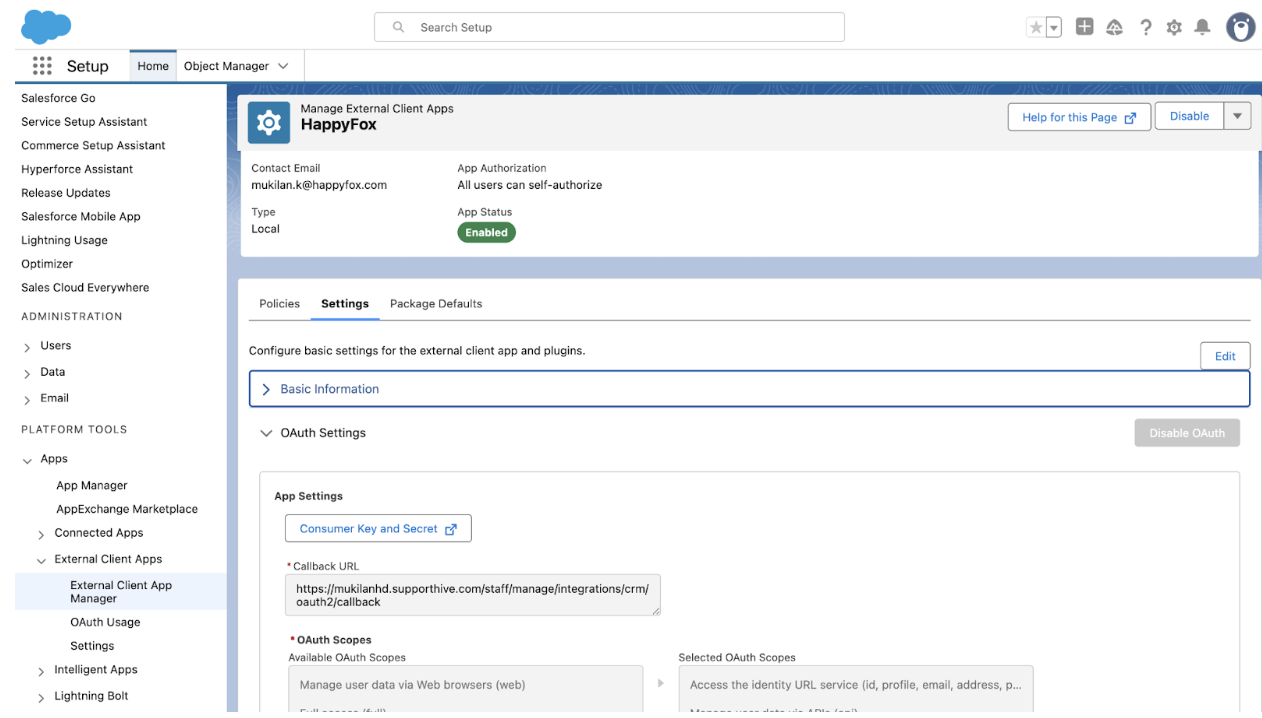
4. Enable OAuth Settings and use URL (https://<youraccount>.happyfox.com/staff/manage/integrations/crm/oauth2/callback) to fill callback URL.

Note:
While configuring the app in Salesforce, please ensure to disable Require Proof Key for Code Exchange (PKCE) Extension for Supported Authorization Flows as shown in the screenshot below. Only Enable OAuth Settings should be selected.
Salesforce takes around 10 minutes to update and sync any changes made to an existing API key. Please note this time period while setting up the integration.
5. Select the OAuth scopes:
- Manage user data via APIs (api)
- Access the identity URL service (id, profile, email, address, phone)
- Perform requests at any time (refresh_token, offline_access)
6. Once the connected app is saved, you need to access the corresponding External Client App Manager page to get the consumer key and secret.
Configuring the Salesforce App inside HappyFox
-
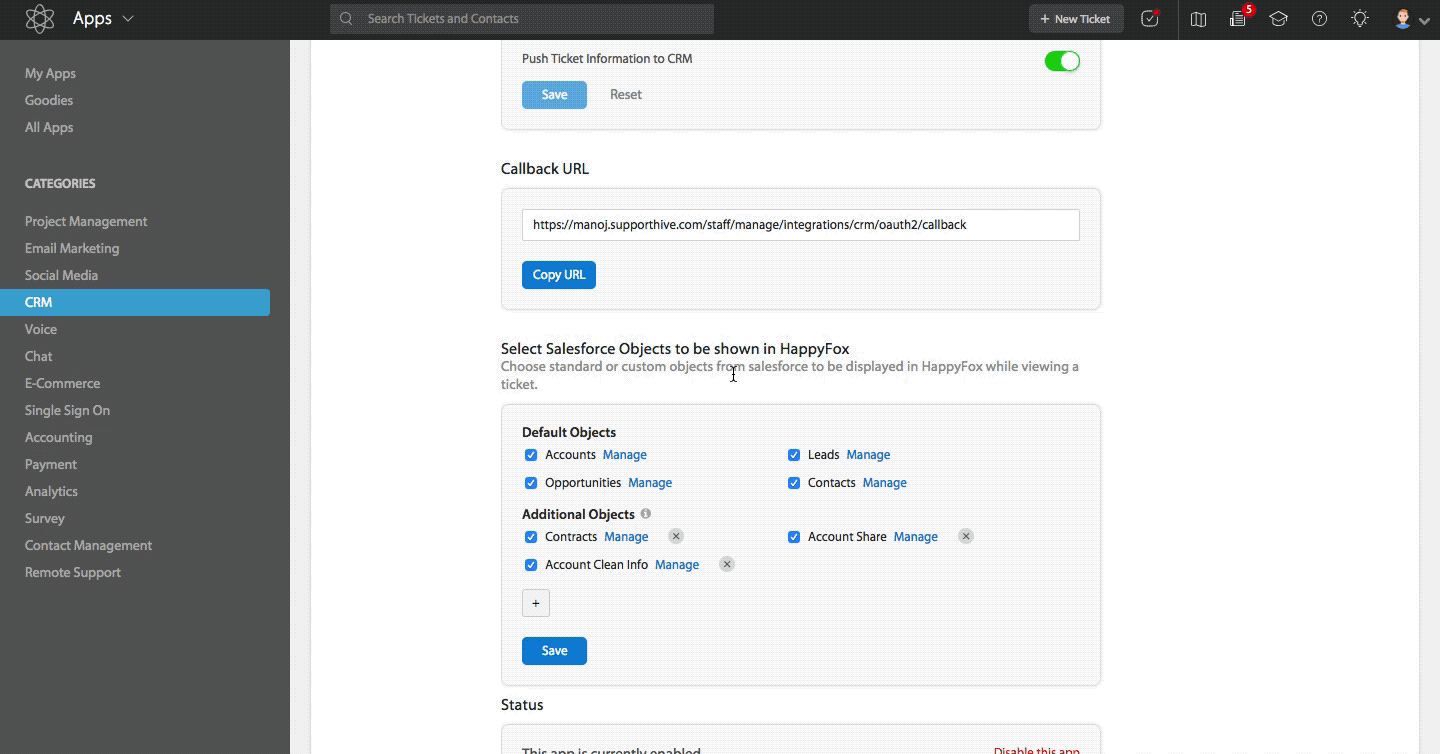
Go to Apps >> CRM >> Salesforce [From the main menu].
-
Click "Install".
-
Paste the Consumer Key and Consumer Secret from Salesforce.
-
Click "Save". This will redirect you to the Salesforce Authenticator. Please enable pop-ups for your HappyFox instance in your browser for this action.
-
After successful authentication, the Salesforce app inside HappyFox will be automatically Linked.

Adding a Salesforce Object for viewing in HappyFox
-
Go to Apps >> CRM >> Salesforce.
-
Click “Manage”.
-
Choose one or more standard/custom objects from salesforce to be displayed in HappyFox while viewing a ticket.
-
Click Save.
-
The results will be fetched as per the rules defined above.

Configuring Object Field Visibility and Display Order:
-
Go to Apps >> CRM >> Salesforce.
-
Click “Manage”.
-
Click “Manage” located adjacent to the Object you’d like to modify.
-
Select desired fields and drag to change their display order in HappyFox. The selected fields are ordered row-wise as shown in the ticket details page.
- Click Save.
Viewing Salesforce Information Inside HappyFox:
The integration displays CRM information from Salesforce for matching HappyFox contact,
-
Dynamically, when creating a new ticket.
-
Inside the Details page for a ticket.
List of information propagated from Salesforce:(Customizable as mentioned above)
-
Contact Details.
-
Account Details.
-
Lead Details.
-
Opportunity Details.
-
Details of additional objects configured
Actions:
-
You can expand linked details inside contact/account/lead/opportunity/Additional object information by clicking on individual items inside them.
-
You can click the "Pop up" icon, to open the corresponding contact/account/lead/opportunity/Additional object landing page inside Salesforce.
Note: Only "Direct" account linked to at the time of contact creation will be displayed along with its linked contact in HappyFox.
Salesforce information displayed while creating a new ticket:

Salesforce information displayed for the corresponding HappyFox contact inside the ticket details page:

Pushing Ticket information from HappyFox to Salesforce:
You can also push ticket information as a Salesforce CRM case against the contact information.
To enable this feature,
-
Go to Apps >> CRM >> Salesforce.
-
Click "Manage".
-
Enable the "Push Ticket Information to CRM" toggle.
-
Click "Save". This enables the feature.

The following of information are synchronized from HappyFox into Salesforce contact cases:
-
Status
-
Ticket Subject.

Disable Salesforce App from HappyFox:
Only one CRM app can be active in your HappyFox account. If you would like to try out other CRM apps, you have to disable Salesforce app first.
Steps:
- Go to Apps >> CRM >> Salesforce.
- Click "Manage".
- To temporarily disable the app, click "disable the app" link inside "Status"
To know how Salesforce Integration works with HappyFox Classic, please refer to the document attached.

