The Zoom integration in HappyFox Help Desk enables agents to schedule, manage, and summarize Zoom meetings directly from within support tickets. This streamlines customer conversations and provides better context for ticket resolution without switching between tools.
Key Features
- Generate Zoom meeting links inside support tickets.
- Add meeting links to ticket replies.
- Automatically post AI-generated meeting summaries as private ticket updates.
- Attach meeting recordings and transcripts from Zoom as ticket updates.
Setting Up Zoom Integration with HappyFox
If you’ve already installed the Zoom app in HappyFox, skip to Part 2: Enable Summaries, Recordings, and Transcripts.
Steps to Integrate Zoom:
- Go to the Apps section in your HappyFox Help Desk account.
- Select Zoom from the list of available apps.
- Click Install.
- Generate your Zoom credentials and provide the following details:
- Account ID
- Client ID
- Client Secret
- Click Save to complete the authentication process.
Generating Zoom Credentials:
-
Visit the Zoom App Marketplace.
-
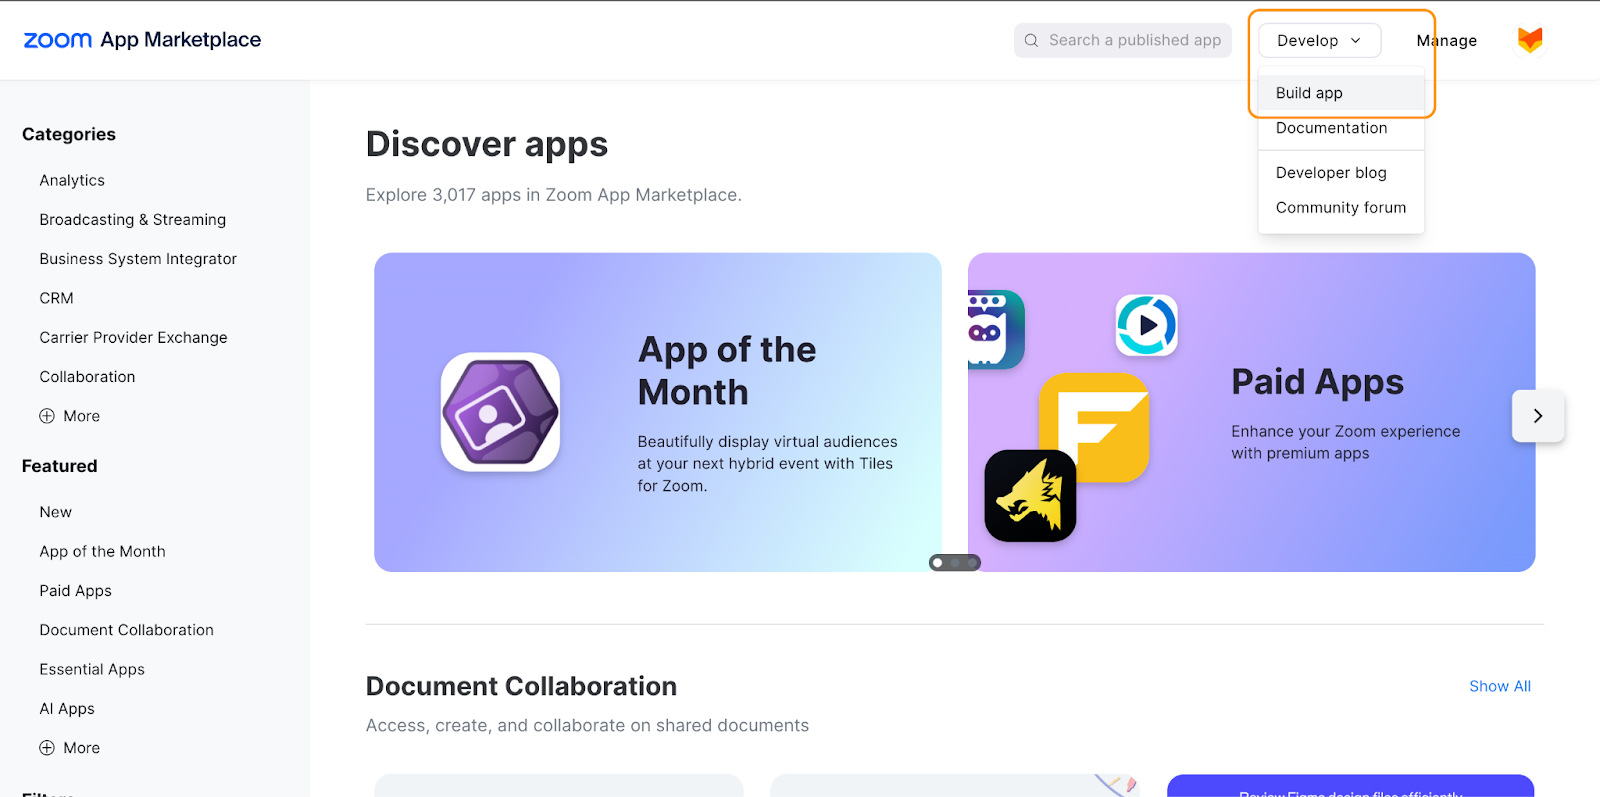
Navigate to Develop and click Build App.
-
Select Server-to-Server OAuth as the app type.
-
Provide a name for your app and click Create.
-
Complete all mandatory fields under the Information and Feature sections.
-
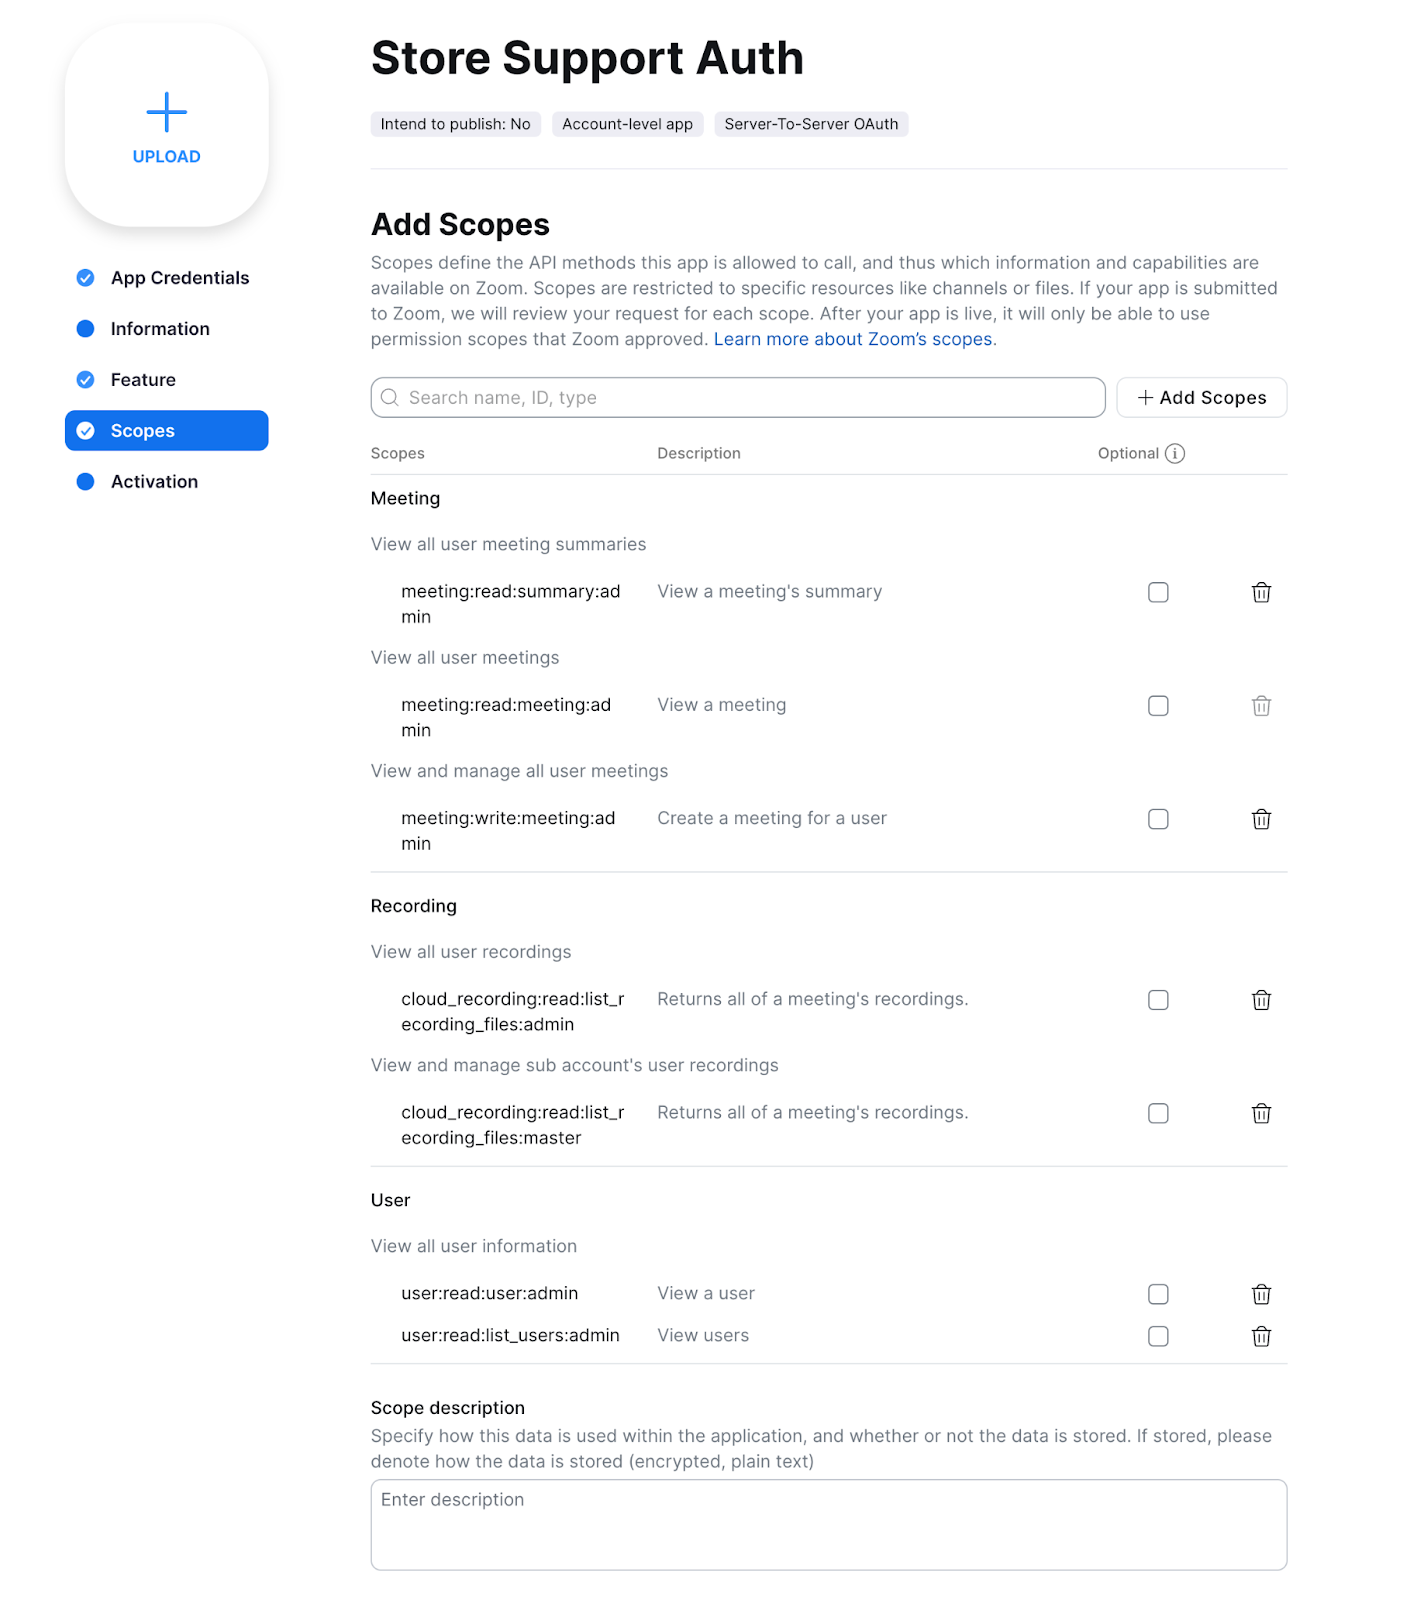
Under Scopes, add the following:
- meeting:read:summary:admin – View a meeting's summary
- meeting:read:meeting:admin – View a meeting
- meeting:write:meeting:admin – Create a meeting for a user
- cloud_recording:read:list_recording_files:admin – Returns all of a meeting's recordings
- cloud_recording:read:list_recording_files:master – Returns all of a meeting's recordings
- user:read:user:admin – View a user
- user:read:list_users:admin – View users
- Copy the Account ID, Client ID, and Client Secret, and use them in the HappyFox Help Desk Zoom integration page.
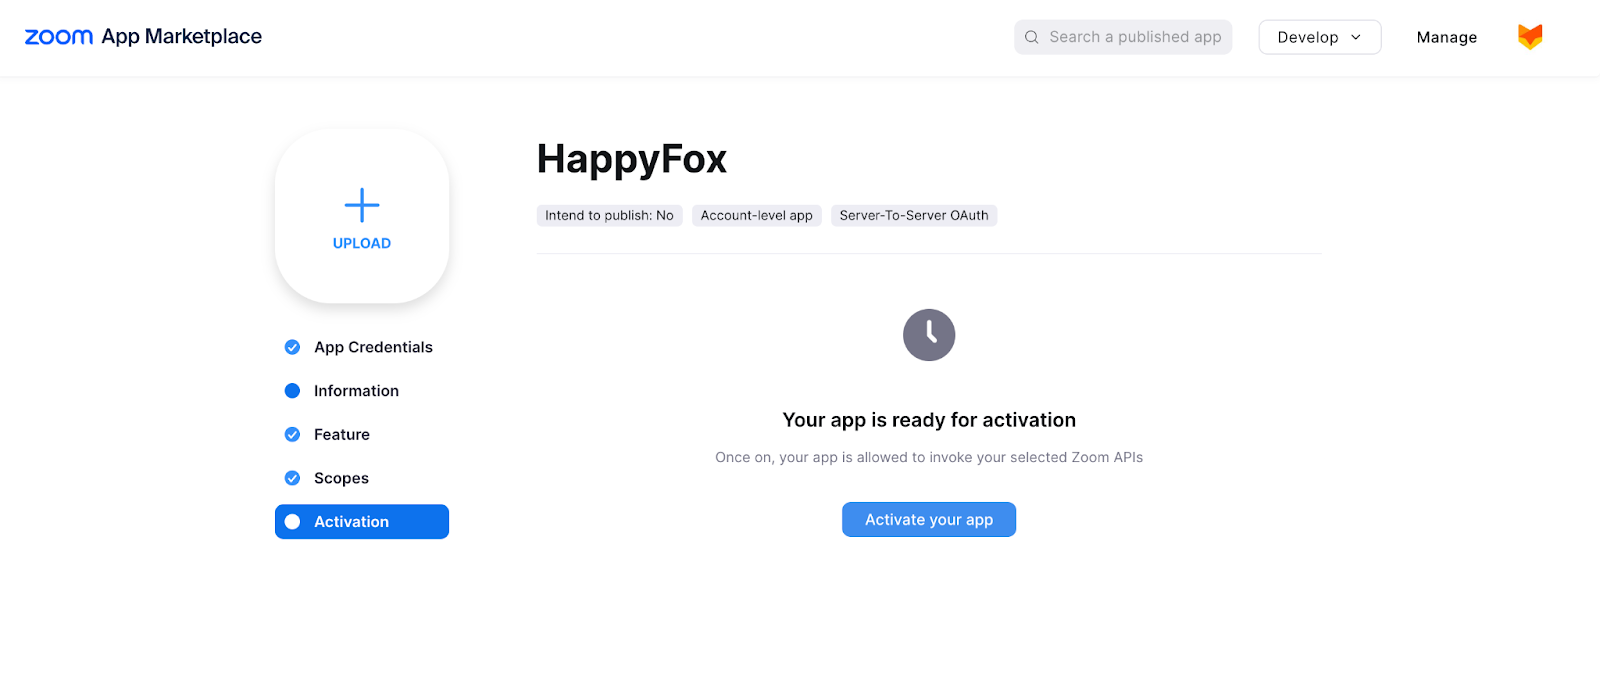
- Make sure to activate the app from the Activation module by clicking on
Activate your appbutton
Enabling Zoom Meeting Summaries, Recordings and Transcripts
Meeting summaries, recordings and transcripts are sent automatically to the ticket as internal updates when a Zoom meeting ends.
Note: If you're just creating the Zoom app, these scopes were already added in "Setting Up Zoom Integration with HappyFox", proceed to step 2.
Step 1: Add Scopes for summary, recordings and transcript (for existing apps)
-
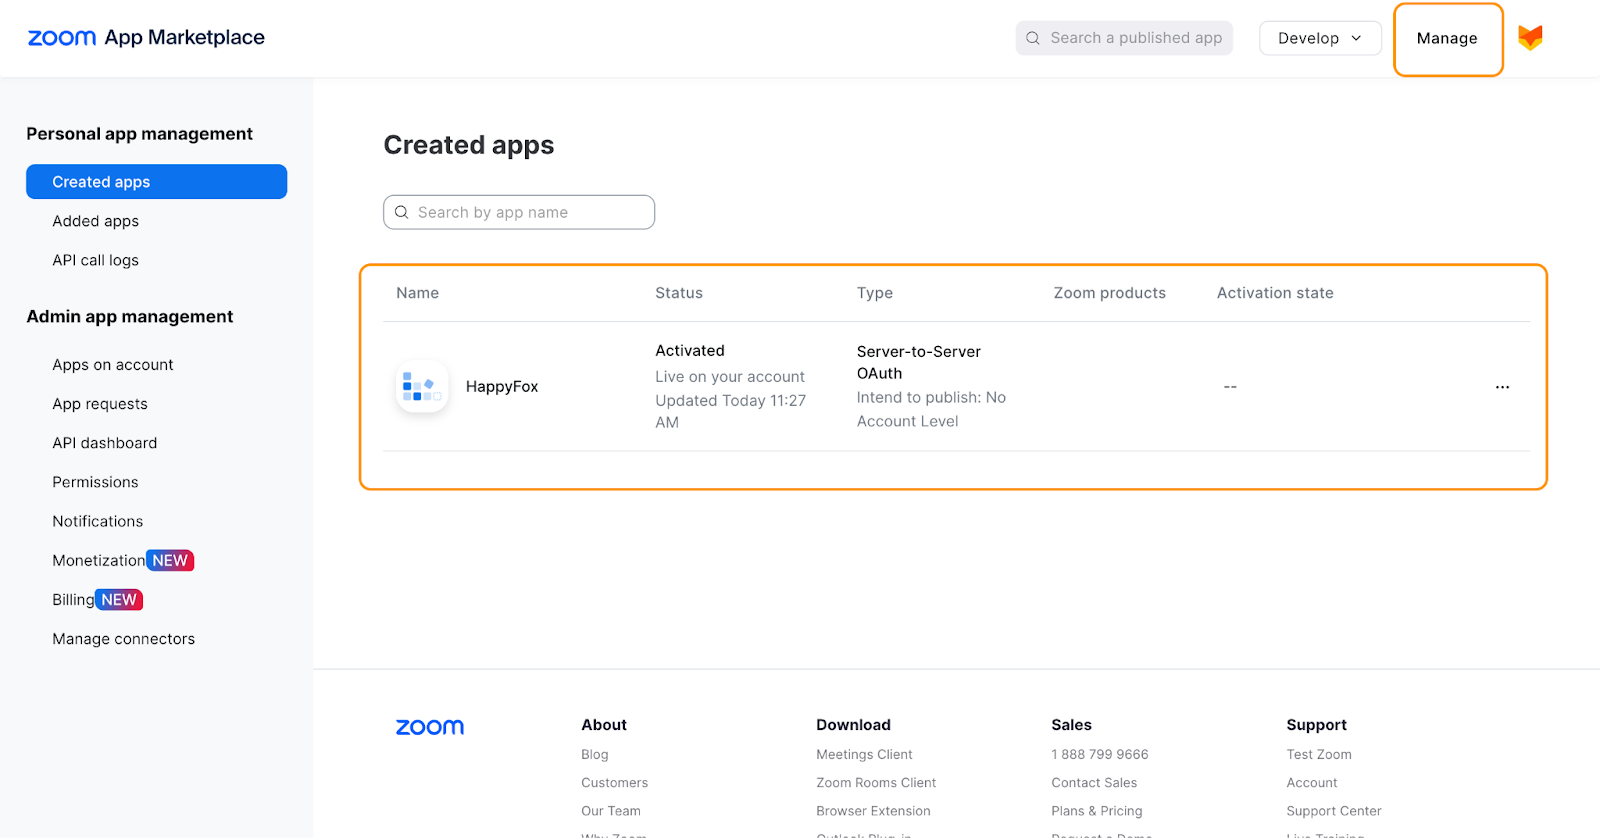
Go to the Zoom App Marketplace and click Manage.
-
Select your existing Zoom app.
-
Under Scopes, ensure the following is added:
- meeting:read:summary:admin
- cloud_recording:read:list_recording_files:admin
- cloud_recording:read:list_recording_files:master
Step 2: Get the Secret Token
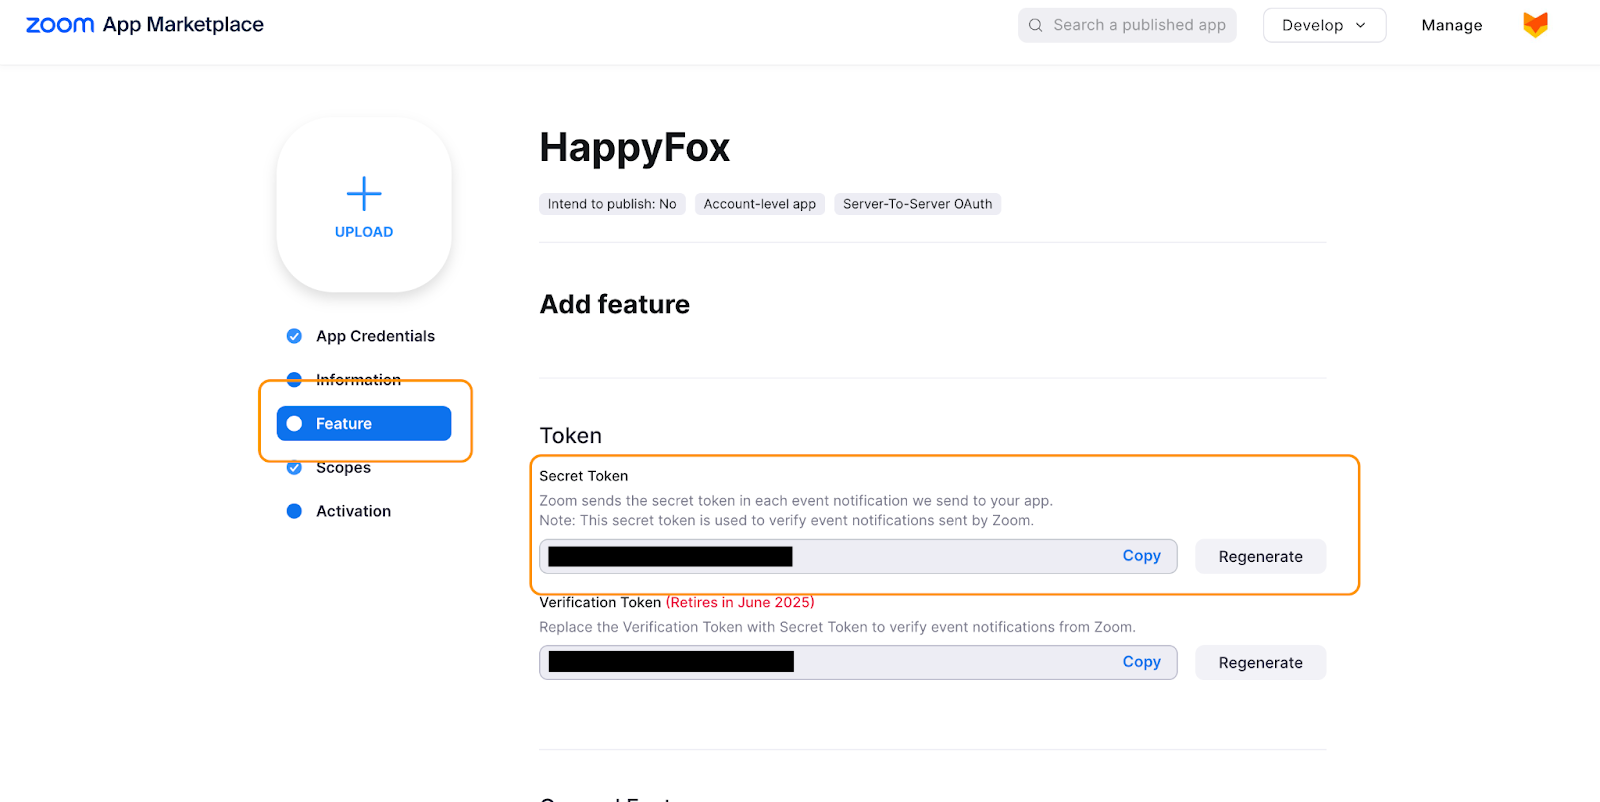
- In the left panel of your Zoom app, go to Feature.
- Copy the Secret Token shown there.
Step 3: Configure in HappyFox
- Go to Apps > Zoom in your HappyFox account.
- Enable "Meeting summary as ticket update".
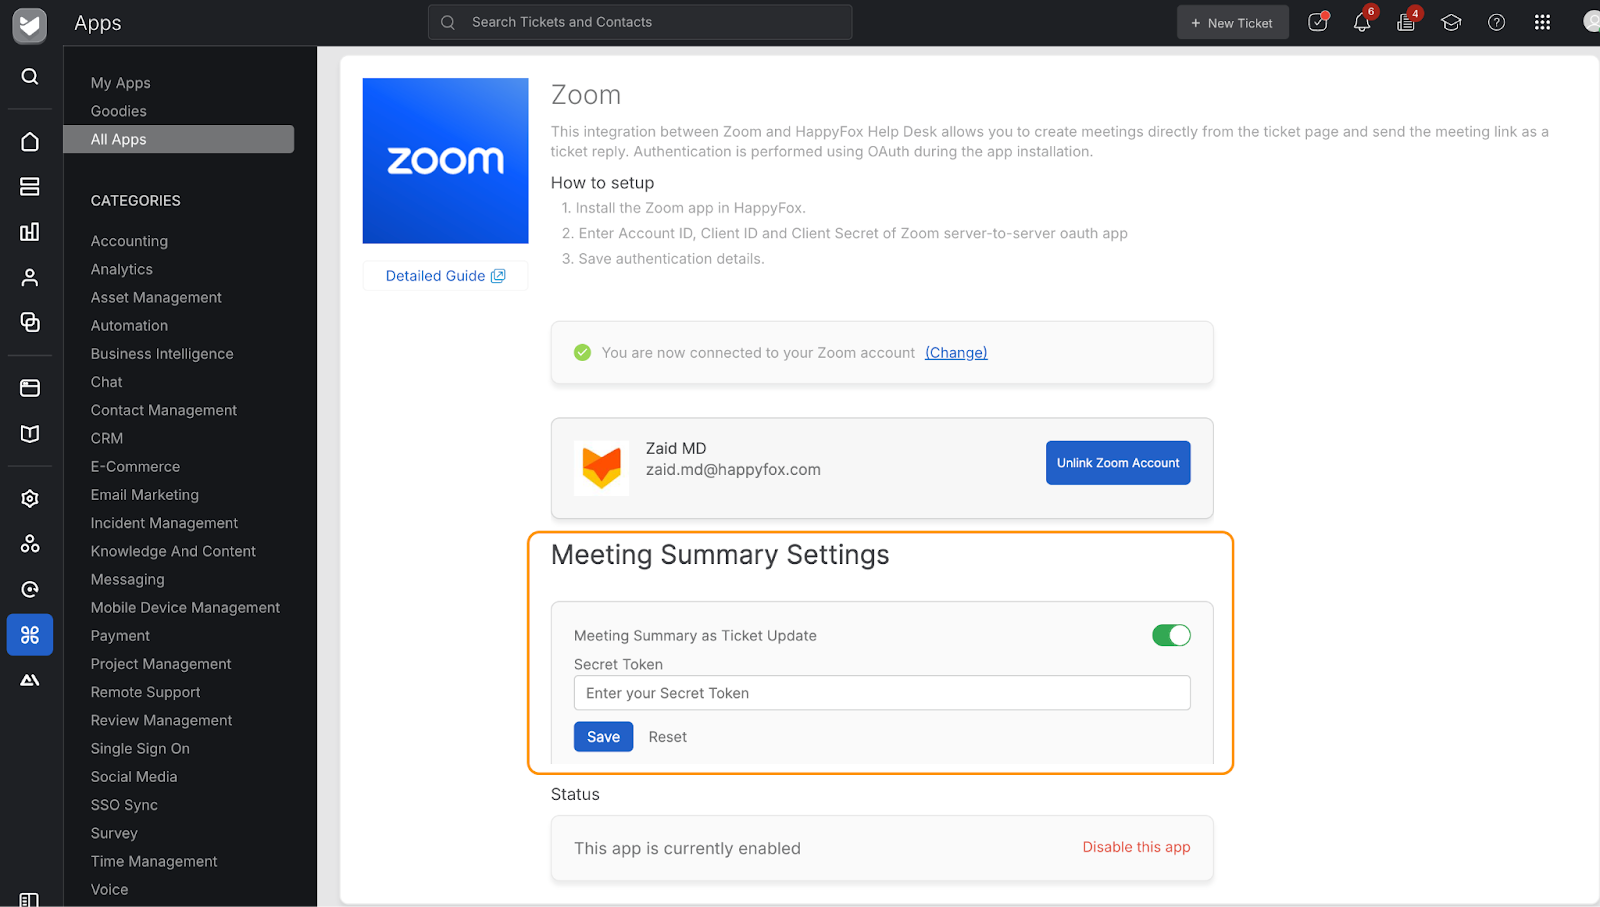
- Paste the Secret Token and click Save.
- Copy the Webhook URL that appears after saving.

Step 4: Set Up Event Notifications in Zoom
- Go back to your Zoom app under Feature > Event Subscriptions.
- Toggle ON Event Subscriptions.
- Paste the Webhook URL in the Event notification endpoint URL field.
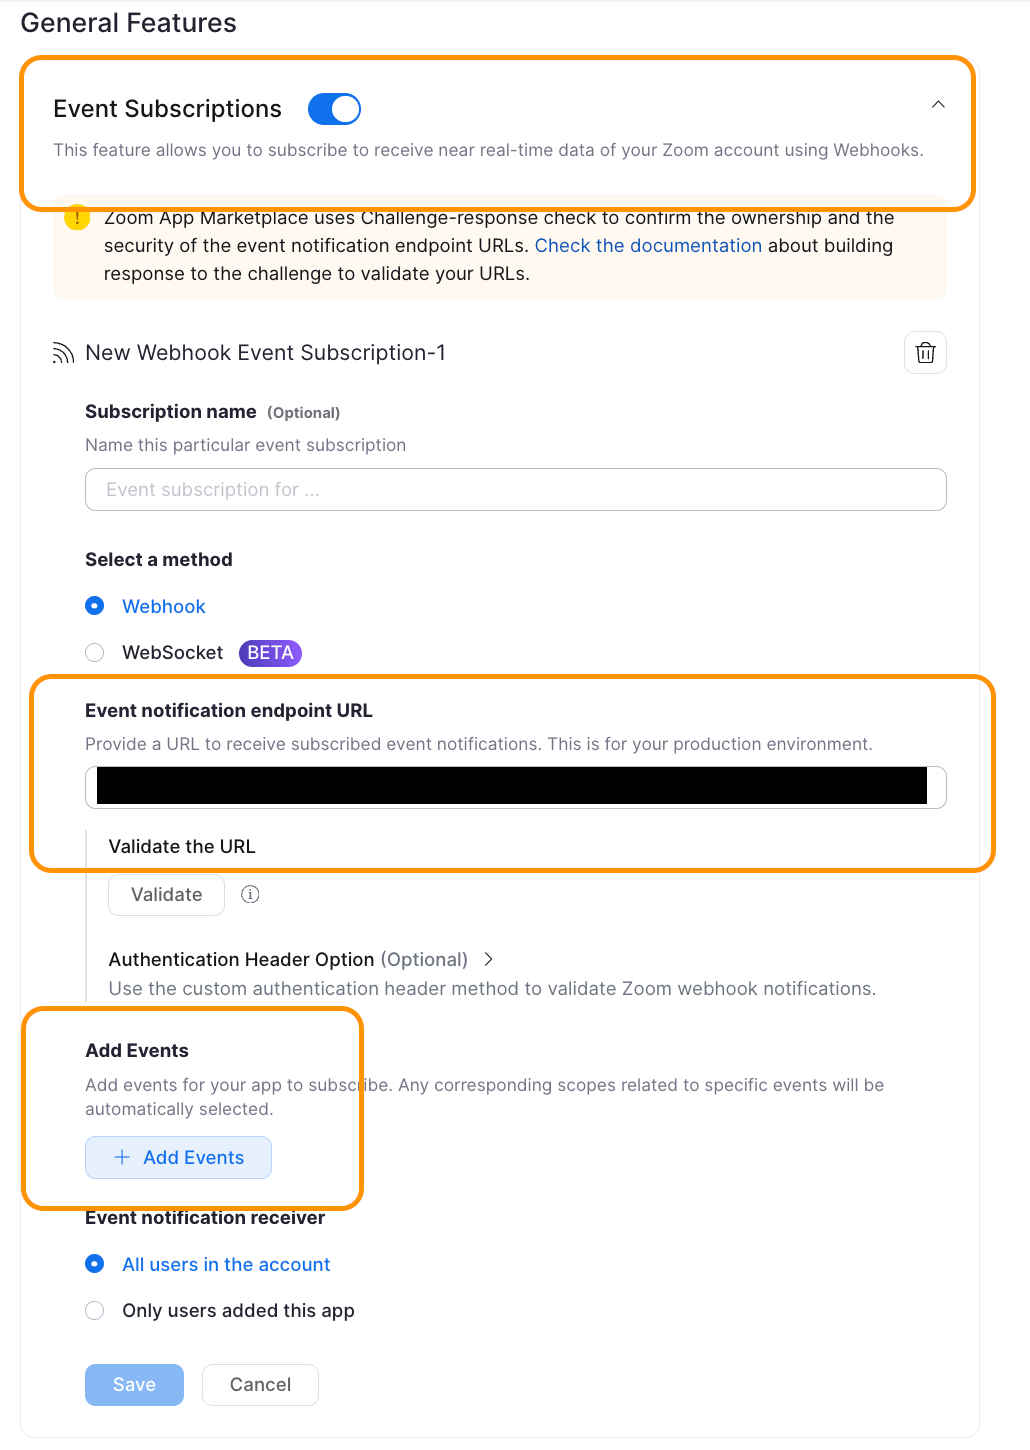
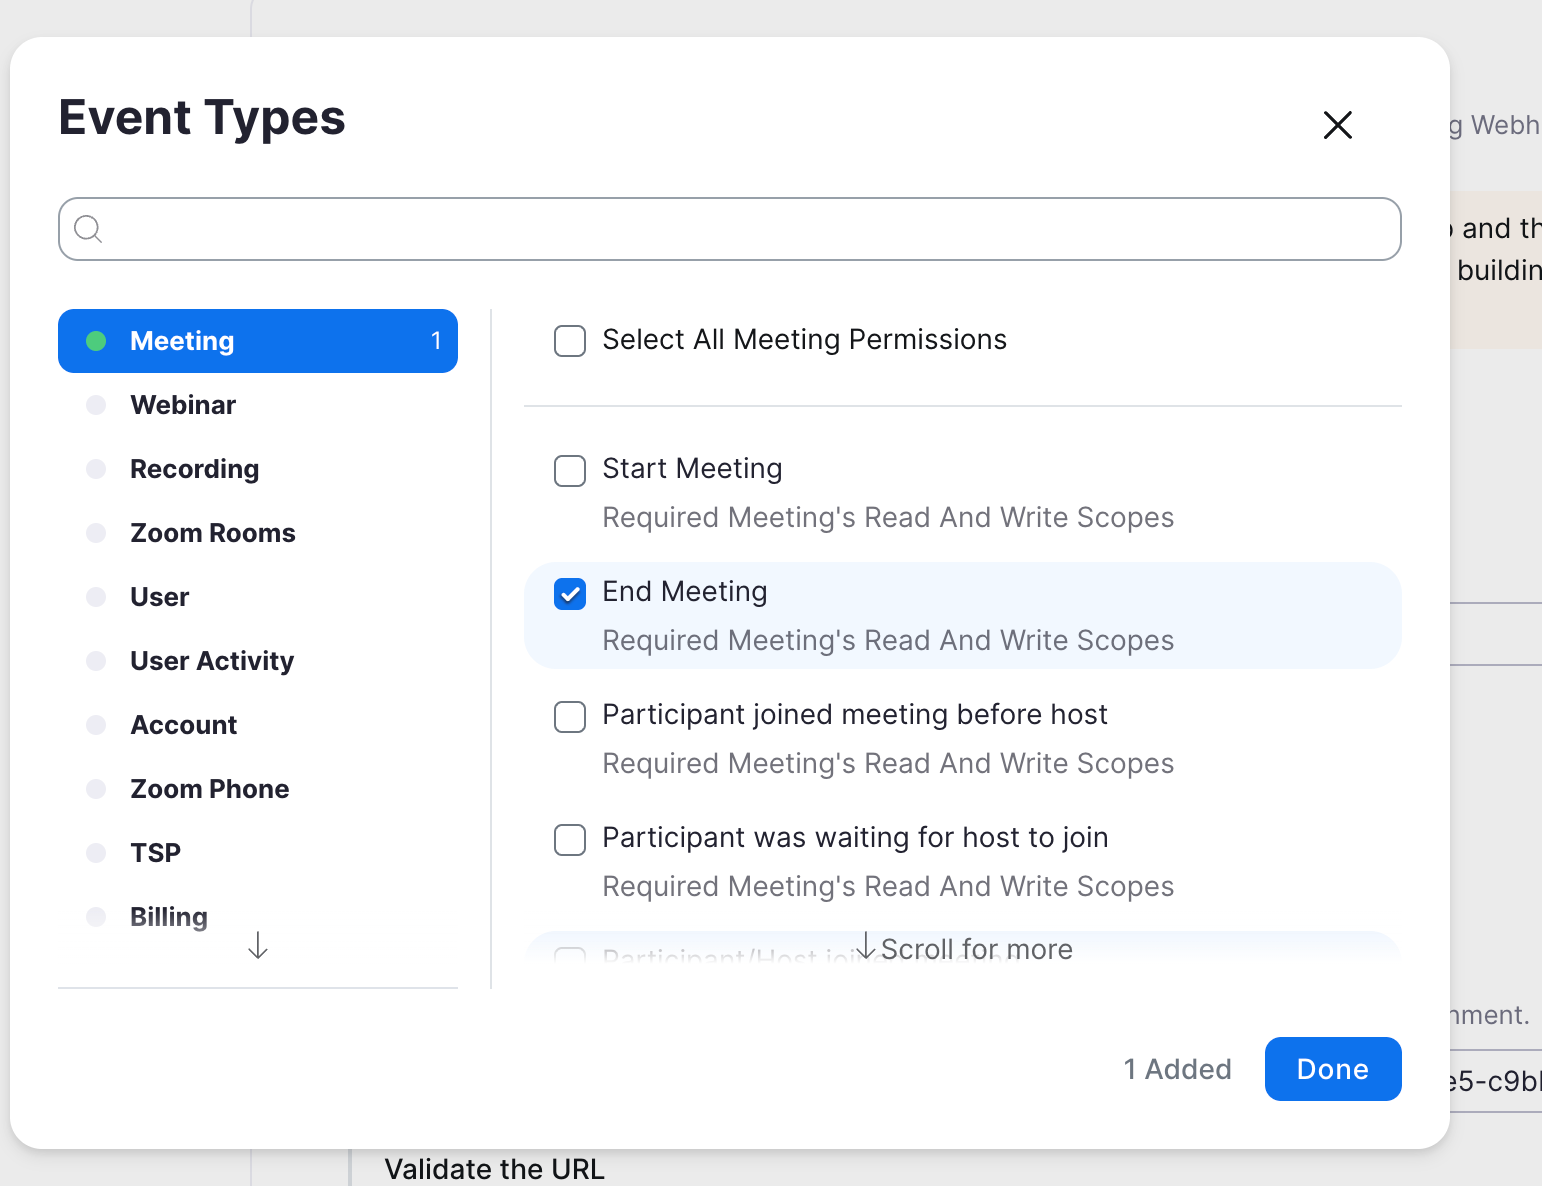
- Click Add Events, select End Meeting, then click Done and Save.
How to Add a Meeting Link to a Ticket
-
Open the ticket where you want to add the meeting link.
-
In the right pane, under the Zoom section, click Generate Zoom meeting.
-
The system will create a meeting and display the Zoom meeting link along with the meeting’s timestamp.
-
If a meeting has already been created, agents can choose Regenerate Zoom meeting if needed.
Note: Currently we are not supporting linking of existing meeting links in the ticket detail page.
-
To add the meeting link to the ticket reply, click Add meeting link to the ticket reply. This will insert the Zoom link directly into the reply editor.
How Zoom Recordings, Transcripts, and Summaries Are Added to a Ticket
- Once a Zoom meeting ends, HappyFox will automatically fetch the meeting’s AI-generated summary (if enabled in Zoom), along with the meeting recording link and transcript.
- These items are added to the associated ticket as a private note, giving agents and internal teams additional context.
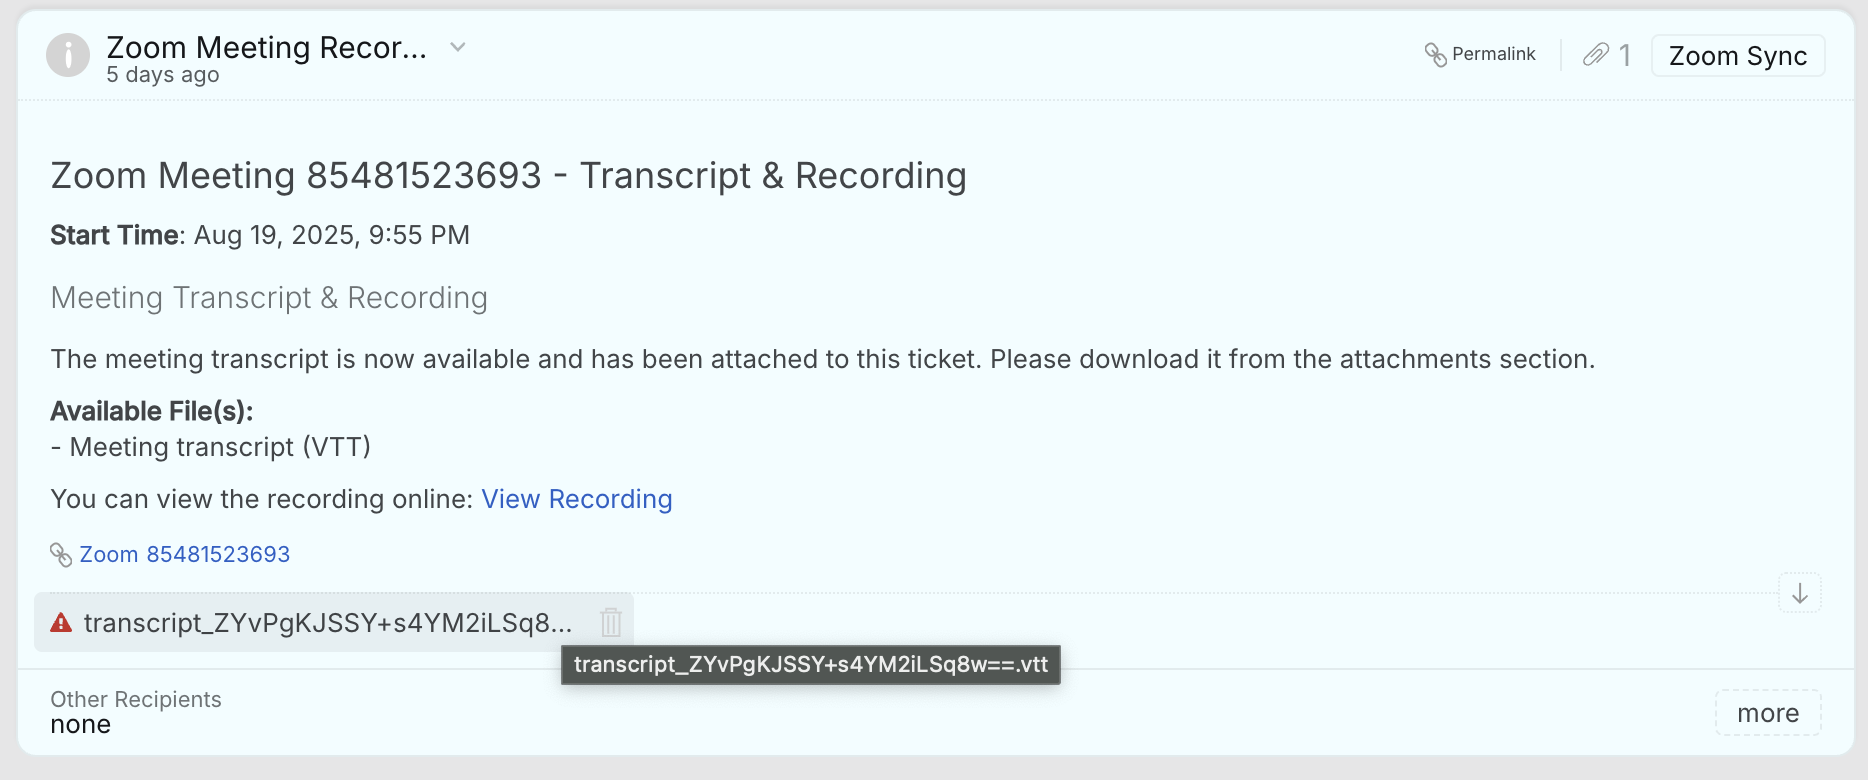
- The transcript will be attached as a PDF file, and the meeting recording will be added as a playable URL.
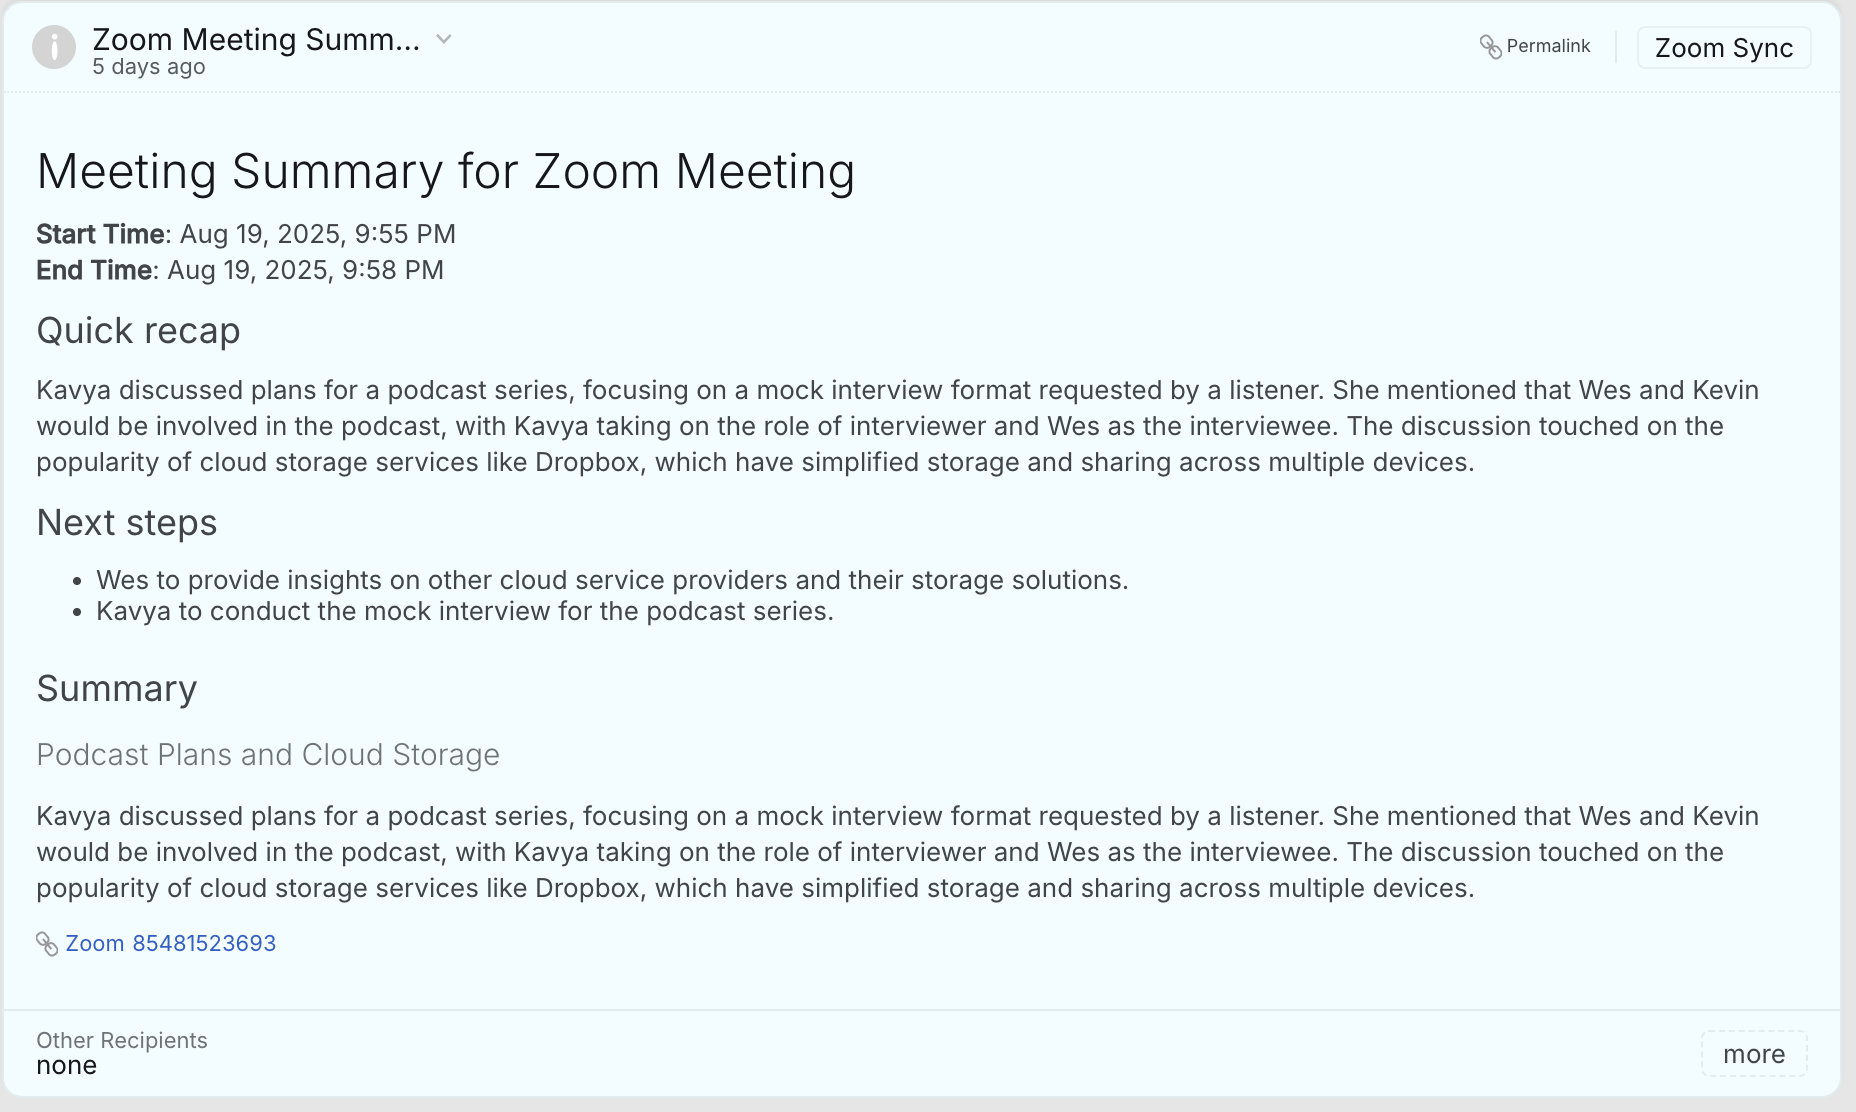
- The AI summary will appear inline in the private note for quick reference.
- These updates typically appear within 15–20 minutes after the meeting ends.
Important Notes:
- The agent who creates the Zoom meeting from the ticket must also be a part of the authenticated Zoom account.
- Availability of recordings, transcripts, and AI summaries depends on the customer’s Zoom plan and enabled features.
How to Unlink a Zoom Account from HappyFox Help Desk
If you need to remove the Zoom integration from your HappyFox account:
- Go to the Apps section in HappyFox Help Desk.
- Select Zoom from the list of installed apps.
- Click the Unlink Zoom account button.
- Confirm the action to successfully unlink your Zoom account from HappyFox Help Desk.
Once unlinked, agents will no longer be able to generate or manage Zoom meeting links within tickets until the integration is reinstalled and linked again.
When relinked with the same account again, the meeting created and linked to the ticket will be fetched and retained.
Limitations & Notes
- The agent creating the meeting must be part of the authenticated Zoom account. Otherwise, they will see an error and the meeting will not be created.
- Meeting summaries, recordings, and transcripts are dependent on the Zoom plan and feature availability (e.g., AI Companion, cloud recording, transcripts).
- Links generated are instant meeting links and follow Zoom’s expiration policy.
- AI summaries may take up to 15–20 minutes to appear in the ticket.
Frequently Asked Questions
Can I regenerate a new Zoom link for an existing ticket?
Yes. Once a meeting has been generated, agents can select Regenerate Zoom meeting to create a new link for the same ticket.
Will the Zoom link expire after the meeting?
No. The Zoom link is reusable, allowing agents to use the same link for follow-up meetings if needed.
Does generating a Zoom link create an event in my calendar?
No. Generating a Zoom link does not create a calendar event. The link is for immediate use and is not saved as an event in your Zoom calendar.
Does every Zoom account support meeting summaries?
No. Only Zoom accounts with AI Companion features enabled have access to meeting summaries.
Are AI Companion features enabled by default in Zoom?
No. Zoom AI Companion features, including meeting summaries, are not enabled by default. The host must manually enable them for their Zoom account, and they can also choose who receives the summary.
What happens if my Zoom account doesn't have AI features enabled?
If your Zoom account doesn't have AI Companion features, the meeting:read:summary:admin scope will not be available when setting up the app. In that case, the meeting summary will not be added to the associated ticket in HappyFox