HappyFox integration with Salesforce B2C commerce (formerly Demandware) enables enterprises to provide stellar billing support and improve the post-purchase experience for customers.
Integration Summary:
- View Salesforce B2C Commerce Cloud customer information and recent orders within a HappyFox ticket.
- Lookup Salesforce B2C Commerce Cloud customer and order information, and use it while creating a new HappyFox ticket.
-
Multi-Store Support 🛍: Multiple Salesforce B2C Commerce stores can be linked to HappyFox. Customer information and recent orders from the various Salesforce B2C Commerce Cloud stores integrated into HappyFox are displayed inside the ticket details page and in the new ticket creation form.
Applicable Plans: ❌ Mighty ❌ Fantastic ✅ Enterprise ✅ Enterprise Plus ✅ Starter ✅ Growth ✅ Scale ✅ Scale Plus
Salesforce B2C Commerce Cloud Integration Guide
- Log in to HappyFox.
- Go to Apps >> E-Commerce >> Salesforce B2C Commerce Cloud.
- Click "Install".

- Enter your Salesforce B2C Commerce Server URL:
- A sample server URL: https://prod-01.acmeinc.demandware.net/
Obtaining Client ID and Client Secret from Salesforce B2C Commerce:
- Enter your Client ID and Client Secret from OCAPI OAuth settings inside Salesforce B2C Commerce Cloud:
- For this purpose, you'd have to create an API client. For detailed instructions, visit this guide.
- Note: Only Account administrators can use Account Manager to create API clients.
- Once you created an API client, the client ID and client secret will be accessible inside Salesforce B2C Commerce Cloud.
- Copy the Client ID and Client Secret and paste them within the appropriate fields inside HappyFox.
- For this purpose, you'd have to create an API client. For detailed instructions, visit this guide.
Obtaining Username/Password Credentials from Salesforce B2C Commerce:
- Create a new role in Salesforce Commerce Cloud with the functional permission "Create_Order_On_Behalf_Of" enabled. For detailed instructions on creating a role, visit this guide.

- Create a new user in Salesforce Commerce Cloud. For detailed instructions on how to create a user, visit this guide.
- Assign the newly created user with the newly created role.
- Copy the login and password information that the new user entails. Paste them under appropriate fields inside HappyFox.
- In case you are using Unified Authentication method for user login, please paste the access key in the password area. Learn more about how to create access keys in SFCC here.
- Once all the fields are successfully entered, click "save" to save the configuration.
Configuring OCAPI Settings inside Salesforce B2C Commerce:
- The next step is to configure the OCAPI settings inside Salesforce B2C Commerce cloud. You should be seeing the Shop and Data JSON configuration upon successful setup.

- Copy the Shop and Data JSON configuration and then paste them inside their respective fields inside Administration > Site Development > Open Commerce API Setting in Salesforce B2C Commerce. For detailed info about these settings, visit this guide.
- Click "Save" to confirm the configuration.
- Important note 🚨: If you already have some configuration inside the Shop and Data field inside Salesforce B2C, then you'd have to append the shop/data API values from HappyFox to the pre-existing client values in a comma-separated fashion. It is recommended to check with the site administrator/developer before proceeding with this step. Take a back up of your existing settings as a precaution.
Associating Salesforce B2C sites with HappyFox:
-
Once the OCAPI settings config is successfully updated inside Salesforce Commerce Cloud, the next step is to associate the individual sites inside HappyFox.
-
Click "Add New Salesforce B2C Commerce Account".

- Enter the site name.
- Enter the customer list ID's associated with that site, in a comma-separated fashion.
- Hint: Navigate to Administration > Sites > Customer Lists inside Salesforce B2C commerce to obtain customer lists. For more information, visit this guide.
- Associate categories with your Salesforce B2C Commerce Cloud site.
- Only tickets inside associated categories will pull in contextual customer and order-related information for that particular Salesforce B2C site.
- Note: A category can be mapped to a maximum of 3 SFCC sites. So plan your site-category associations accordingly.
- Ensure Site Status is marked as enabled.
- Click "Save" to save the configuration.

Enabling the Salesforce B2C Commerce App:
- Under the "Status" section, ensure the app is currently enabled.
- Voila! You're all done with the integration configuration!

To add another Salesforce B2C Commerce Cloud site,
- Go to Apps >> E-Commerce >> Salesforce B2C Commerce Cloud.
- Click "Manage".
- Click " Add New Salesforce B2C Commerce Cloud Account" and repeat the steps described above to integrate a Salesforce B2C Commerce Cloud site.
To Managing Existing sites:
- Go to Apps >> E-Commerce >> Salesforce B2C Commerce Cloud.
- Click "Manage".
- Click "Gear Icon" next to each site enables you to edit or delete that particular site.
Salesforce B2C Commerce Cloud sites Customer and Order information displayed in "Ticket Creation Form":

Salesforce B2C Commerce Cloud sites Customer and Order information displayed in "Ticket Details Page":
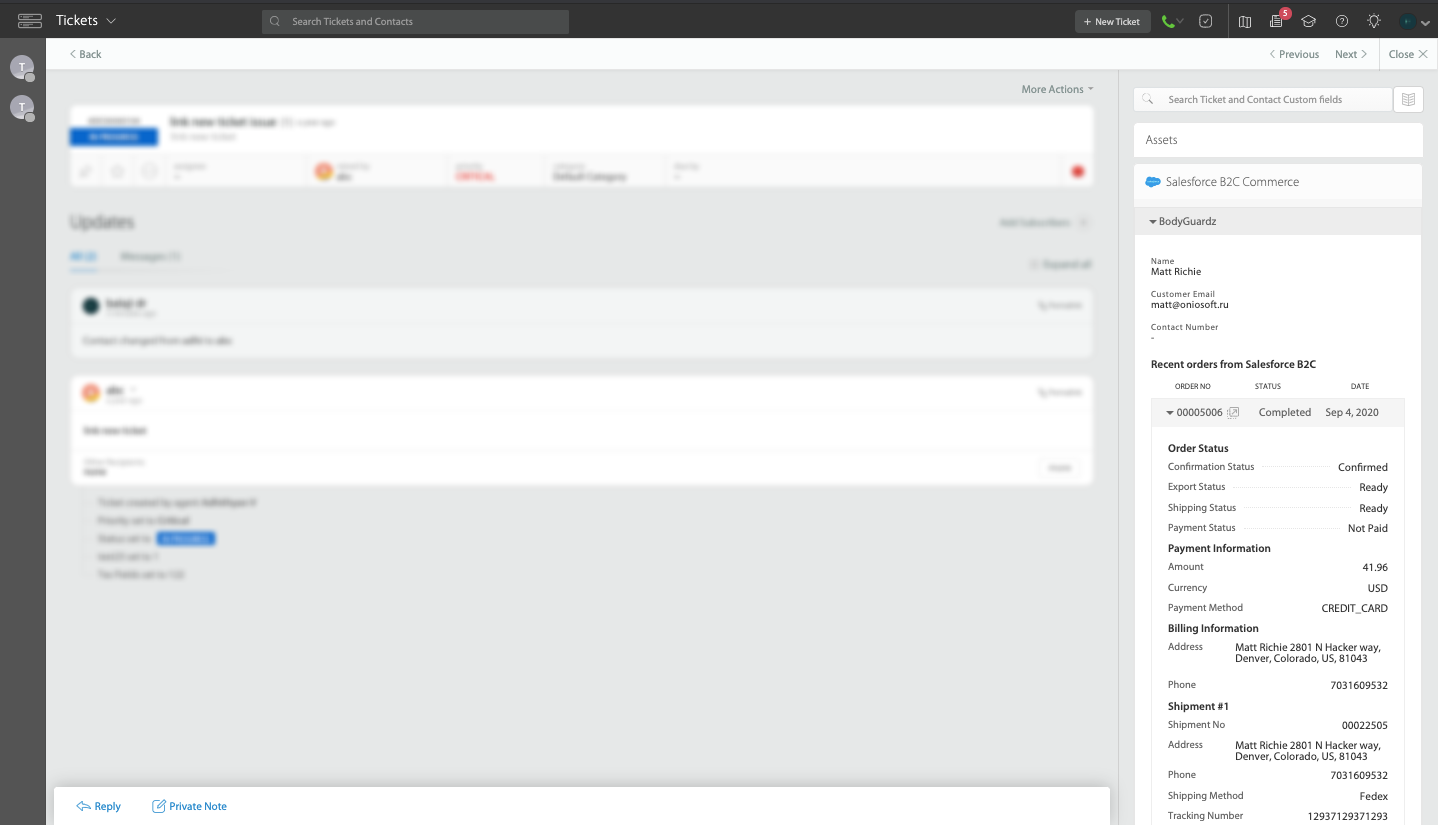
Tip: Click on the pop-out icon under "order no" to directly land inside the corresponding Salesforce Commerce Cloud order details page.
Troubleshooting Steps:
- In case of any integration failure:
- Delete the Salesforce B2C Commerce Cloud site inside Manage >> Apps >> Salesforce B2C Commerce Cloud.
- Integrate the corresponding Salesforce B2C Commerce Cloud site with HappyFox again.
- Cross-verify the username/password as well as client id and client secret and ensure they're up-to-date.
- If the issue persists, contact [email protected]
- If your organization has enforced IP restrictions inside SFCC, it is required to whitelist the following IP addresses which are used by HappyFox for the purpose of integration:
- 54.213.101.86, 54.213.101.90, 54.218.238.220,
- 54.187.103.206, 54.200.182.110, 52.40.203.205