 25290
25290
Facebook Pages have increasingly become a popular choice for customers to communicate with your brand. By integrating HappyFox to your organization's Facebook page, you can receive and respond to customer's Facebook messages and posts inside HappyFox.
Available on All Pricing Plans.
Plan based limit on the number of linkable pages: Mighty - 3, Fantastic - 5, Enterprise / Pro - 7 and Enterprise Plus/Enterprise PrO - 10.
How to Integrate your Facebook page to HappyFox?
Note: You'll need to be an Admin of the Facebook page you are looking to integrate.
- Log in to HappyFox.
- Go to Apps >> Social Media >> Facebook.
- Click Install. In the subsequent screen, click "Link Facebook".
- You will be asked to Authorize HappyFox.
- You will then be redirected to HappyFox and you can see the list of all the pages that are associated with your Facebook account.

Configuring Individual Facebook Pages:
After successful linking, the next step would be to configure which Facebook Pages you would want to support within your helpdesk.
Choose the "Gear" Icon present for each page to manage their individual settings.
You will be able to toggle:
- Status - Enable to make corresponding Facebook Page Integration active.
- Posts - Enable to convert posts into tickets in HappyFox.
- Messages - Enable to convert Facebook messages into tickets in HappyFox.
You must associate an existing non-email integrated HappyFox Category for the corresponding Facebook Page. Tickets will be created under the chosen category.
Note: Facebook API does not accept payloads with HTML code & inline images and hence they are not supported in Facebook tickets.
Facebook recently stopped allowing replies to DMs from third party integrations such as HappyFox, after 24 hours. Thereby, agent replies after 24 hours will not be received by the customer.

How to identify Tickets that were created from Facebook?
Lookout for "Facebook" icon adjacent to the Ticket Subject.

Responding to Facebook Page Customer Messages inside HappyFox:
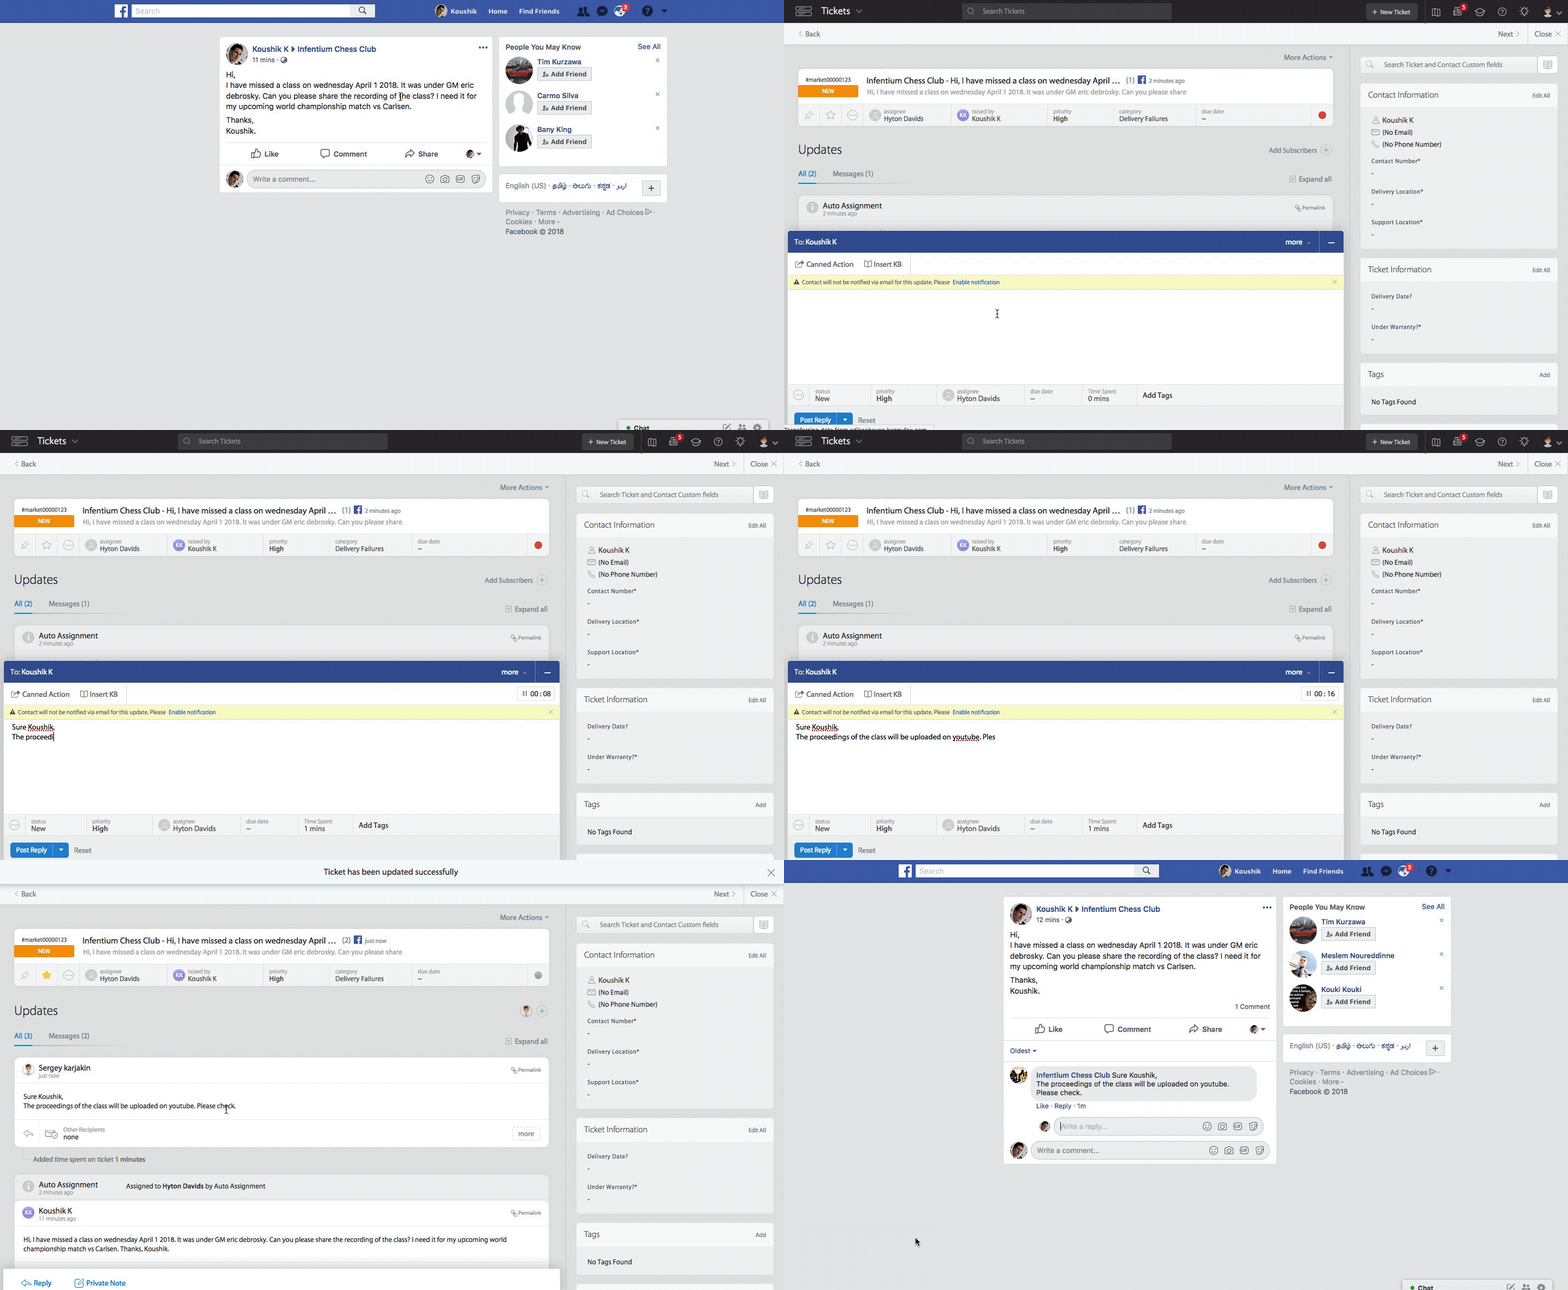
Once you've successfully set up the Facebook integration and enabled "Status" and "Messages" toggle for the corresponding page, you will be able to see Facebook Messages being converted as Tickets inside HappyFox.
You can proceed to compose a reply to the ticket, just like you would for a facebook message, the same will be propagated to Facebook. The customer would see the exact response you sent from HappyFox on his Facebook Messenger.
'Raised by' Name carries the name of the contact, who messaged on the Facebook page.

Responding to Facebook Page Customer Posts inside HappyFox:
Once you've successfully set up the Facebook integration and enabled "Status" and "Posts" toggle for the corresponding page, you will be able to see Facebook Posts created by customers being converted as Tickets inside HappyFox.
You can choose to reply in two different ways:
1. Reply to a Customer post:
Click on the ticket's reply button to add comment to the facebook post.

2. Reply to an existing Reply to the post. (Two-Level Threading)
Click on the individual update's reply button to reply to a comment in a threaded fashion.

Note: Posts created by the page will not be created as a ticket inside HappyFox.
Replies/Messages Sent Directly From Facebook:
If you choose to reply to a message/post directly from Facebook instead of your HappyFox helpdesk, then "Sent Via Facebook" placeholder can be seen in the corresponding ticket update.
Unlink/Disable Facebook Integration:
To Unlink Facebook, Go to Apps >> Social Media >> Facebook and click "Unlink".
After Facebook has been unlinked:
1. Previously created tickets from Facebook via this account will be unlinked.
2. You will not be able to send further updates on those tickets.
3. You can re-enable the integration with the same Facebook account again, but further messages to any of your integrated pages will be created as new tickets.
To Disable entire Facebook integration, disable the "Status" toggle. To disable individual Facebook pages, toggle their respective "status".
❗Case: Some of my facebook pages (for which i am the admin) are not displayed inside Apps >> Social >> Facebook >> Manage >> Facebook Pages. How do i integrate such pages?
✅ Solution: Visit the following end-point URL to refresh the integration and pull the latest pages from Facebook.
https://happyfox.com/facebook/initiate-oauth/?app_callback_url=https://{{domain}}.happyfox.com/staff/manage/integrations/hf_facebook_login_success/
Where {{domain}} represents your HappyFox account name.
To know about how Facebook Integration can be configured with HappyFox Classic, please refer to the document attached.


