This article explains how the Check Conditions action evaluates ticket and workflow data against a set of rules, and how you use it to branch a workflow into different paths based on the result.
Prerequisites
- A workflow with a trigger already configured. See how to build your first workflow.
- The field or value you want to test must already be available in the workflow — either from the trigger app or from an earlier action.
What it does
Check Conditions evaluates a condition group against the data available in the workflow at that point, then routes execution down a Yes branch or a No branch depending on whether the group matches. This is the action that makes branching possible in HappyFox Workflows — without it, a workflow can only run in a straight line from trigger to actions. With it, you can send a ticket down one set of actions if a rule is met and down a different set if it isn't.
You can add more than one Check Conditions action to a workflow, and you can nest a Check Conditions action inside the Yes or No branch of another one. This lets you build multi-level decision trees — check the request type first, then check the priority within that branch, then check the requester's department within that, and so on.
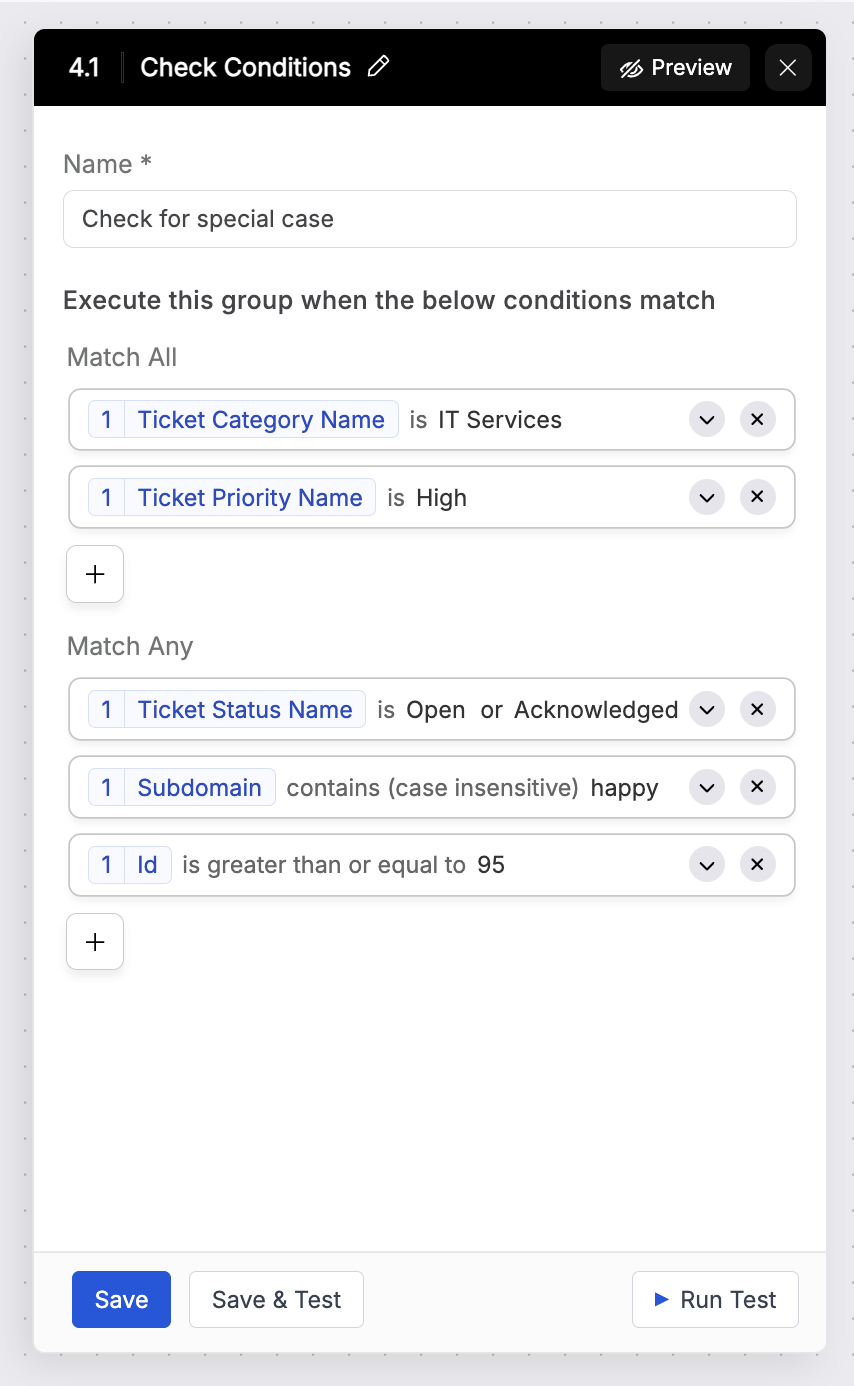
The Check Conditions configuration panel, showing the Name field and the Match All and Match Any condition groups.
Available options
| Field | What it does |
|---|---|
| Name | Identifies the condition group so you can recognize it later in the workflow builder and in Run History. |
| Match All | A set of rules that must all be true for the group to match — equivalent to an AND condition. |
| Match Any | A set of rules where at least one must be true for the group to match — equivalent to an OR condition. |
| Field | The ticket field, contact field, or workflow value you want to test (for example, Priority or a custom field). |
| Predicate | How the field is checked against the value you provide. See the full list of predicates below. |
| Value | The value to compare against, for predicates such as is, is not, contains, does not contain, equal to, list contains, and list does not contain. |
| Value (numeric thresholds) | For numeric predicates, the comparison threshold — entered as less than, less than or equal to, greater than, or greater than or equal to |
Available predicates
| Text and set predicates | Numeric predicates |
|---|---|
| is | less than |
| is (case insensitive) | less than or equal to |
| is not | equal to |
| is not (case insensitive) | greater than |
| is set | greater than or equal to |
| is not set | |
| contains | |
| contains (case insensitive) | |
| does not contain | |
| does not contain (case insensitive) | |
| list contains | |
| list does not contain |
Note: If you add rules under both Match All and Match Any in the same group, the group only matches when every Match All rule is true and at least one Match Any rule is true.
How the branches work
Every Check Conditions action produces a block
- If the group matches, the workflow enters the block branch and runs the actions placed inside it. Once every action inside the branch completes, the workflow exits the branch and continues to the next step in the parent flow.
Warning: If any action inside the Block fails, the entire workflow fails at that point. No further actions run — inside the branch or after it. Test each action inside a Check Conditions branch individually with Save and Test before enabling the workflow.
How to use it
- Open the workflow and click Add Action.
- Select Check Conditions from the action list.
- Enter a Name for the condition group — use a name that describes what the group checks, such as "Priority is Urgent."
- Choose whether to add your rules under Match All, Match Any, or both, depending on whether the group should require every rule to match or just one.
- Select the Field you want to test.
- Select a Predicate from the list.
- Enter a Value to compare against, or enter the numeric threshold under less than, greater than, less than or equal to, greater than or equal to if you selected a numeric predicate.
- Repeat steps 5–7 for each additional rule in the group.
- Click Save and Test to confirm the group evaluates as expected against a sample ticket.
- Add actions inside the Yes branch for the outcome you want when the group matches. Leave the No branch empty, or add separate actions there for the non-matching outcome.
Note: Is set and is not set check only whether the field has a value — they don't require a Value entry.
Nesting a Check Conditions action
You can add another Check Conditions action inside an existing Yes or No branch to check a second, more specific set of rules once the first group has already matched.
- Inside the Yes (or No) branch, click the + icon where you want to insert the next step.
- Select Check Conditions again to add a nested condition group.
- Configure the nested group the same way as the parent group, using a distinct Name so the two groups are easy to tell apart in Run History.
Common use cases
- Request type routing: Route an IT asset request down a "Standard" path or a "Custom" path depending on the request type field, so each type gets its own checklist and approval flow.
- Priority-based escalation: Check whether Priority is greater than or equal to a set threshold and send only high-priority tickets down an escalation branch with manager notifications.
- Department-based approval: Match a custom field against a department name so that onboarding or access-request tickets route to the correct approver group automatically.
- Multi-field eligibility checks: Use Match All to confirm several conditions at once — for example, a ticket is both Category is Refund and Amount greater than 500 — before triggering a finance approval step.
- Nested decision trees: Check the request type first, then nest a second Check Conditions action inside the matching branch to check priority or department, building a multi-level routing path from a single trigger.
- Fallback handling: Pair Check Conditions with is not set to catch tickets missing a required custom field and route them to a data-cleanup branch instead of the main process.
Check Conditions now routes this part of your workflow based on the rules you defined.