Dayforce Contact Sync automatically brings your Dayforce employee directory into HappyFox Help Desk as contacts. Once configured, the sync runs daily and keeps your contact database current without manual updates.
Available on ProEnterprise PROand all unlimited agents plans
NOTE This integration is currently in beta. If you run into any issues during setup, reach out to HappyFox support.
Before you start
- Your HappyFox agent role must have the Manage Apps permission.
- Have the following Dayforce credentials ready:
- Company ID
- Username
- Password
NOTE Only the following 11 fields can be mapped as custom contact fields during setup: Employee Number, Hire Date, Termination Date, Region, Site, Ledger Code, Department Name, Job, Location, Location Code, and Manager Name. The Dayforce account used for the integration must be granted Web Services access to these fields (see the Web Services Field-Level Access step below) for mapping to work correctly.
Configure Dayforce Contact Sync
In Dayforce
Step 1: Finding your Company ID
Once logged in to Dayforce, look at the URL in your browser's address bar. The Company ID is the last segment of the URL. For example, if the URL is https://test.dayforcehcm.com/acme, the Company ID is acme.
Step 2: Configure your Dayforce user
- Log in to your Dayforce account.
- Go to System Admin > User and find your user account.
- Click your user and select the Is Default checkbox for the role you will use for this integration. This step is required for the integration to work correctly.
- From the hamburger menu in the top left, go to System Admin > Roles.

- Go to Features and confirm that HCM Anywhere and Web Services are checked, with Read Data enabled at a minimum.

- Go to Web Services Field-Level Access.
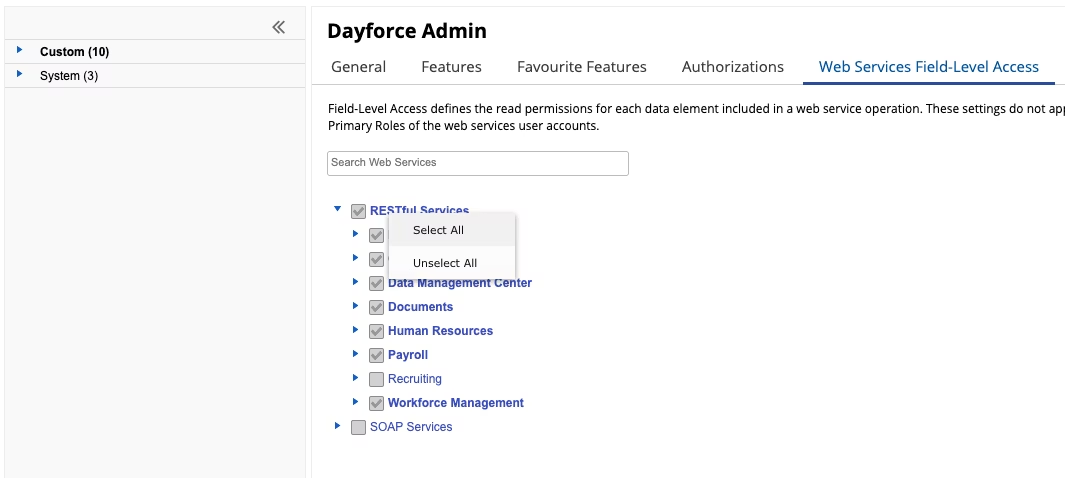
- Navigate to the Human Resources section of RESTful Services.
- Expand Employee and scroll to the very last entry to confirm XRefCode is enabled.
- To make all 11 supported custom fields available for mapping, also expand and enable the following sections under Employee:
- OrgUnitInfos (needed for Region, Site, Ledger Code, and Department Name)
- WorkAssignments (needed for Job, Location, and Location Code)
- EmployeeManagers (needed for Manager Name)
NOTE If any of these sections are left unchecked, the corresponding fields will not appear as mapping options in HappyFox.
- Go to System Admin > User. The user authenticating will need Can See Self enabled.

- Expand the user by clicking the small down arrow, click Location Access, then + Add Location, and add the Company Level Location.
In HappyFox
- Go to Apps > Contact Management, select Dayforce, and click Install.
- Enter your Dayforce credentials: Company ID, Username, and Password.

- Map mandatory Dayforce contact fields (such as name, email, and phone) to HappyFox contact fields.

NOTE The sync matches contacts using email. You can choose whether work email or personal email is used as the primary match, and optionally allow the sync to fall back to the other email type if the selected one is not available for a given employee. If neither email is present on a record, the sync will use the employee's phone number automatically if mapped.
- Map additional Dayforce fields to HappyFox custom contact fields, if required.

NOTE If a Dayforce field contains multiple values (for example, multiple locations), the sync uses the primary value.
- Enable or disable:
- Overwrite existing custom field values during sync. When enabled, HappyFox custom fields update with values from Dayforce if there is a difference.
- Email notification to contacts after import.
- Click Save.
After each sync
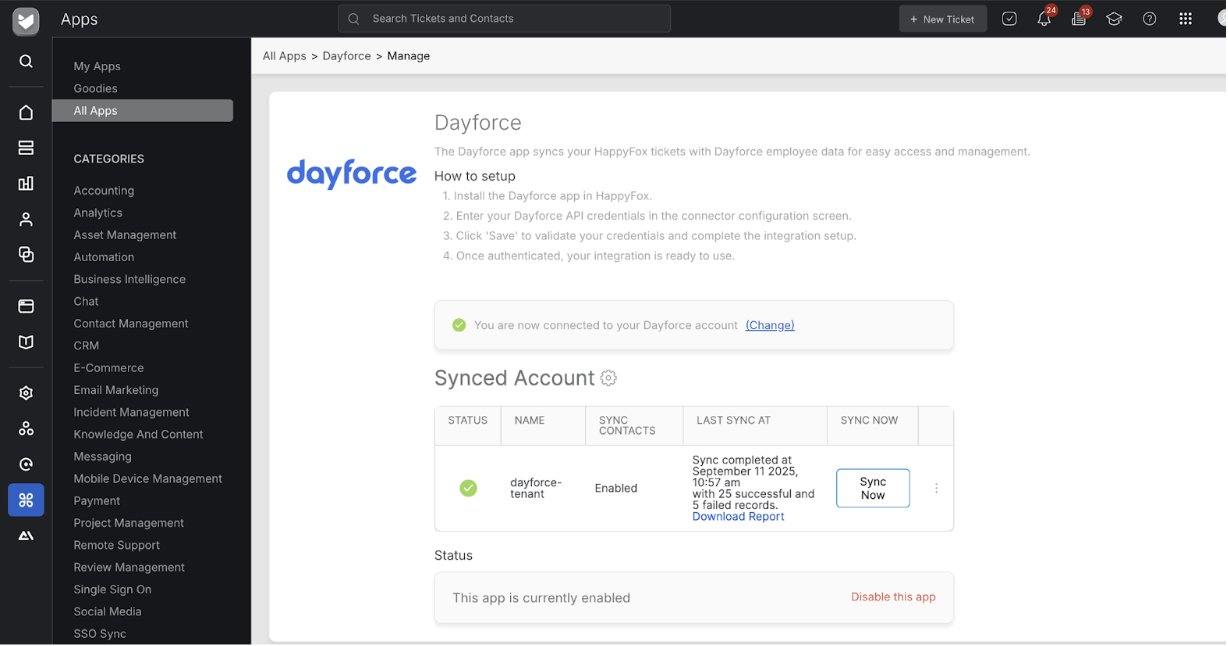
The sync runs automatically every 24 hours based on your HappyFox account timezone. You can also trigger it manually using the Sync Now button. After each sync, you can view:
- Timestamp: Date and time of the sync.
- Record Counts: Number of successfully synced and failed records.
CSV log details
Each row in the error log CSV contains the following columns:
| Column | Description |
|---|---|
| Name, Email, and Phone | Identifying details of the synced contact. |
| Type | Existing: Updated an existing HappyFox contact. New: Added a new HappyFox contact. |
| Sync Status | Success or Failure. |
| Error Details | Reason for failure (for example, datatype mismatch or missing required fields). |
Accessing synced contacts
Synced Dayforce contacts are available in the Contacts module in HappyFox.
Frequently asked questions
Does the sync work both ways?
No, this is a one-way sync. Changes made in Dayforce are reflected in HappyFox, but not vice versa.
Will deleting employees in Dayforce remove them from HappyFox?
No. Once a contact has been synced, it is never removed from HappyFox, even after the employee is deactivated or deleted in Dayforce.
Which employees are synced from Dayforce?
Only employees marked Active in Dayforce are synced.
Are updates to Dayforce fields reflected in HappyFox?
Yes, if the overwrite toggle is enabled, changes in Dayforce fields are updated in HappyFox during the next sync.
How do I delete or disable the sync account?
Click the menu next to Last Sync At and select Delete or Disable.
How do I access the configuration to change sync settings?
Click the settings gear icon next to Synced Account to open the configuration form and update the sync settings