HappyFox supports SAML based single sign on with popular cloud providers like Onelogin, OKTA or your own custom SAML provider. This is available on the Mighty, Fantastic and Enterprise plans in HappyFox. HappyFox also supports single sign on from a self hosted ADFS that could be hosted within your network. ADFS is a service provided by Microsoft as a standard role on Windows servers such that a web login can be provided for the users on Active Directory.
With this set up, you can have your end users (customers) and staff (agents) login to the respective HappyFox panel (end user panel and staff panel) with their active directory credentials. (Skip to the section "Configuring ADFS for staff and end user authentication" below)
Important: Please note that the Account: acmewidgetsco (acmewidgetsco.happyfox.com) we have used in this article is a Test Account for reference purpose only. Please replace it with your HappyFox account name.
Requirements
-
An Active Directory instance where users have an email address attribute
-
A HappyFox account on any of the plans mentioned above
-
A server running Microsoft Server 2012 or 2012R2
-
A SSL certificate to sign your ADFS login page and the fingerprint for that certificate
Installing and Configuring ADFS on your Windows Server
This is the first step that needs to be done if you don't have your ADFS and AD configuration done already. You can refer to this article for more information on how to configure ADFS.
When you have a fully installed ADFS installation, note down the value for the 'SAML 2.0/W-Federation' URL in the ADFS Endpoints section.
If you chose the defaults for the installation, this will be '/adfs/ls/'.
Adding a Relying Party Trust
Open AD FS Management console and click on "Add Relying party trust" on the right pane

You should see a wizard screen like this. Click on Start to start the process of adding a relying trust party.

1. On the next screen, click on the last option "Enter Data About the Party Manually" and press Next

2. Enter a display name here, one which you can identify at a later stage, and press Next.

3. On the next screen, select the ADFS FS profile radio button and press Next.

4. On the next screen, leave the certificate settings at their defaults and press Next

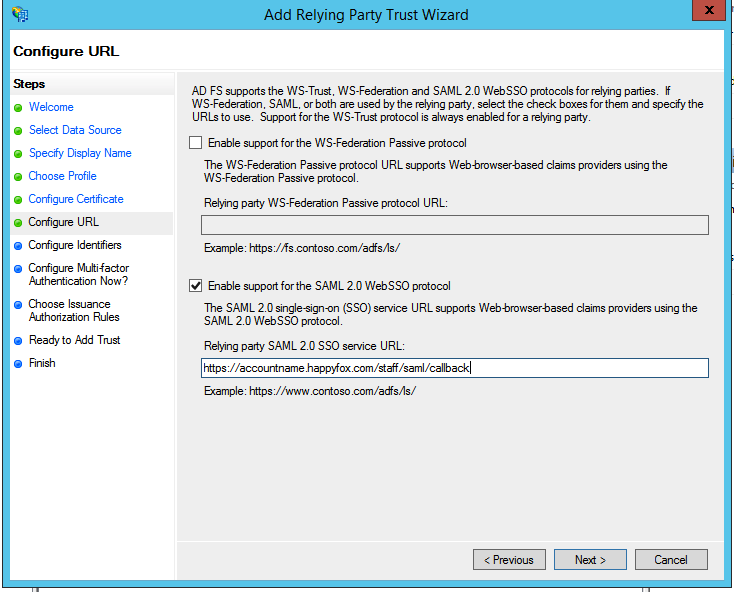
5. On the next screen, check the box labeled Enable Support for the SAML 2.0 WebSSO protocol. The service URL will be https://<accountname>.happyfox.com/staff/saml/callback, replacing <accountname> with your HappyFox subdomain. Note that there's no trailing slash at the end of the URL.
Note:
#1 - If you are using more than one SAML integration in HappyFox, then the ACS callback url for custom SAML should be https://.happyfox.com/saml/custom-saml/callback/ or https:// .happyfox.com/staff/saml/custom-saml/callback/
#2 - If you are using custom domain on your HappyFox help-desk, ensure to include the ACS url in both custom domain format and in default HappyFox url format
6. On the next screen, add a Relying party trust identifier of https://<accountname>.happyfox.com/saml/metadata, replacing <accountname> with your HappyFox account name

7. On the next screen, you may configure multi-factor authentication but this is not something we will be covering in this article. So, you can chooose "I do not want to...." and press Next.

8. On the next screen, select the Permit all users to access this relying party radio button and press Next

9. On the next two screens, the wizard will display an overview of your settings. On the final screen use the Close button to exit and open the Claim Rules editor.

Configuring ADFS for staff and end user authentication
You can do the following steps if you wish to have ADFS based authentication for your staff and end users on HappyFox.
1. Double click on the Relying party that you just added. Go to the Identifiers tab and add one more Relying party identifier with the value - https://<accountname>.happyfox.com/saml/client-metadata/

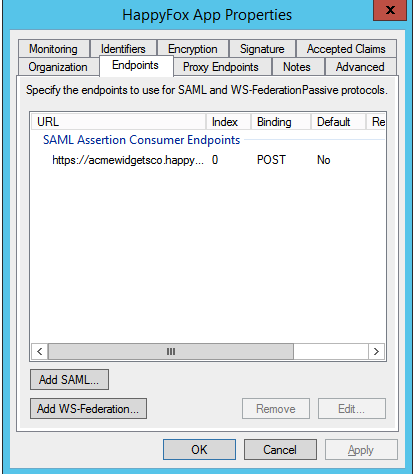
2. Next, go to the Endpoints tab and click on the Add SAML button at the bottom. Enter the following values, as shown in the screenshot below:

Endpoint type: SAML Assertion Consumer
Binding: POST
Index: 1
Trusted URL: https://acmewidgetsco.happyfox.com/saml/callback/
Click OK to save the new end point. The endpoints tab should look like this(screenshot below) once you have added it.

That's it! You can now have your end users and staff login to the respective accounts automatically when the signing to the HappyFox application from the ADFS homepage.
Note: If the same email ID exists in a HappyFox account as both - customer and staff, then preference is given to the staff account. HappyFox will redirect the user to the staff panel.
Creating claim rules
The claim rules for this relying trust has to be set up now. By default the claim rule editor opens once you created the trust.

1. To create a new rule, click on Add Rule. Create a Send LDAP Attributes as Claims rule and click Next

2. On the next screen, using Active Directory as your attribute store, do the following:
1. From the LDAP Attribute column, select E-Mail Addresses.
2. From the Outgoing Claim Type, select E-Mail Address.

3. Click on OK to save the new rule.
4. Create another new rule by clicking Add Rule, this time selecting Transform an Incoming Claim as the template

5. On the next screen:
1. Select E-mail Address as the Incoming Claim Type.
2. For Outgoing Claim Type, select Name ID.
3. For Outgoing Name ID Format, select Email.
Leave the rule to the default of Pass through all claim values.

6. Finally, click OK to create the claim rule, and then OK again to finish creating rules.
Setting up Full Name claim
If you have end users also authenticated through ADFS, you will need to set up the following claim to fetch the name of the end user from Active Directory and map it to the name of the contact in HappyFox.
To pass the full name of a user, create a rule with the Send LDAP Attributes template.
- For the LDAP Attribute, add a row for Surname and a row for Given-Name.
- For the Outgoing Claim Type, select Surname and Given Name.

Adjusting the trust settings
Some more settings and properties need to be tweaked. To access these settings, select Properties from the Actions sidebar while you have the Relying party trust selected.

1. In the Advanced tab, set to SHA-256 or SHA-1.We support both.

2. Confirm that there is an entry in the Endpoints tab, like shown below. This will be automatically added.

3. Confirm you changes by clicking OK on the endpoint and the RPT properties. You should now have a working RPT for HappyFox.
Configuring your HappyFox account
- Login to your HappyFox account staff panel (https://<accountname>.happyfox.com/staff) and go to Apps >> Single Sign-On >> Custom SAML method.
- Choose Yes for SAML Integration Active
- Choose Custom SAML Method in the drop down for Choose SSO provider
- Enter the SSO target URL. This will be something like this https://win-fepfiqek9mi.happyfox.co/adfs/ls, where the domain name associated with your ADFS will constitute the URL followed by the default endpoints - /adfs/ls
- Enter the ldp signature in the box provided below.

Once this is done, you can save the form. This completes the set up of single signon with HappyFox and ADFS. Your staff can then sign into HappyFox from their local domain signin page, using their Active Directory credentials.

Troubleshooting
- Keeping server time in sync: We have seen in some cases the time from the originating server having a mismatch with NTP time, which could cause some errors. HappyFox server time is in UTC and uses NTP servers to keep the time up to date. We recommend keeping your servers in sync with a remote NTP server. In case you are continuing to run into issues, you can increase the time gap allowed by running the following command in Powershell and restarting ADFS.
Set-ADFSRelyingPartyTrust -TargetIdentifier "<replying party identifier>" -NotBeforeSkew 5
- Token signing certificate: In some cases, the certificate used to sign the request from the ADFS server could be set incorrectly. The self signed certificate gets set as the Primary instead of the valid SSL certificate which is set up on your ADFS domain. If this is the case, you can change the Primary certificate under the ADFS >> Service >> Certificates section, as shown below:

Information on updating ldP Signature

In the ADFS app when you navigate to Services -> Certificates, you will find the Token Signing certificate in the PEM format. The certificate in PEM format is what needs to be pasted under the "IdP Signature" text area underneath the SSO Target URL setting. To get it in this format, click on View Certificate on the sidebar, go to the Details tab and click on Copy To File. In the wizard, choose the Base 64 encoded X509 format. Please ensure you select the Primary file and not the Secondary
The content of the file needs to be opened in a Text Editor and it should be pasted as per your screenshot under Manage>>Integration>>SAML>>IdP Signature.