This article explains how to create and manage tables in HappyFox Workflows, and how to use the Lookup Table Row action to retrieve table data dynamically within a workflow.
Applicable Plans: Available on all plans.
What are tables
Tables is a built-in data management module in HappyFox Workflows that lets you store structured reference data — such as escalation rules, SLA tiers, or contact mappings — and look up rows from that data at workflow runtime using the Lookup Table Row action.
This is distinct from the inline Lookup Table action, which maps a fixed set of key-value pairs configured directly in the workflow builder. Tables are managed centrally, can hold any number of rows and columns, and are populated by importing a CSV file. Any workflow can reference a table by name.
Creating and managing tables
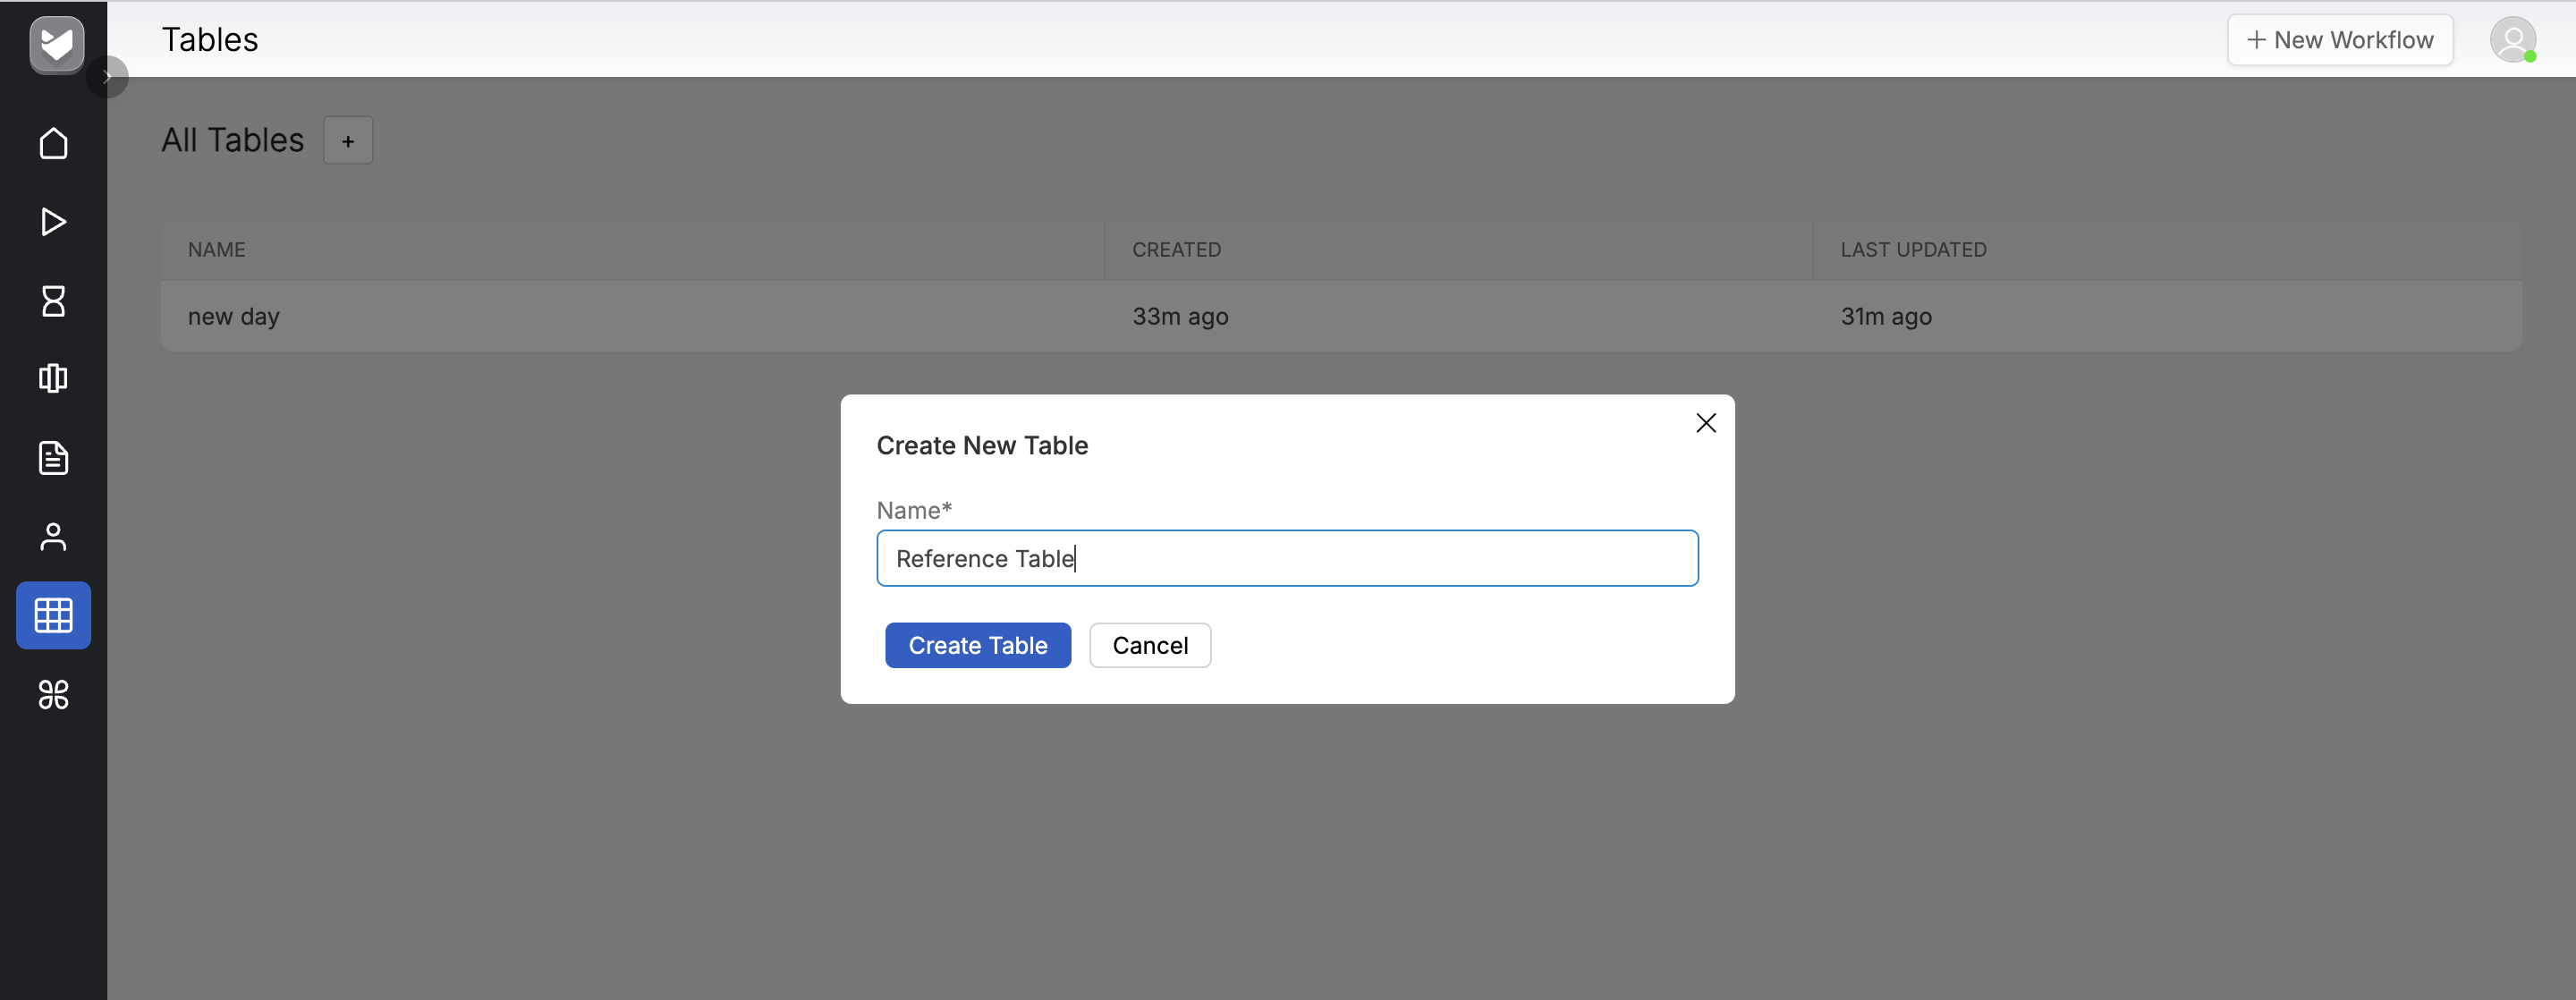
Creating a table
- Navigate to Tables using the table icon in the left sidebar. Hover over the icon to confirm the Tables label.
- Click + next to All Tables, or click Create Table on the empty state screen.
- In the Create New Table dialog, enter a name in the Name field.
- Click Create Table.
Note: Duplicate table names are not allowed. Each table name must be unique across your HappyFox Workflows account.
Importing data via CSV
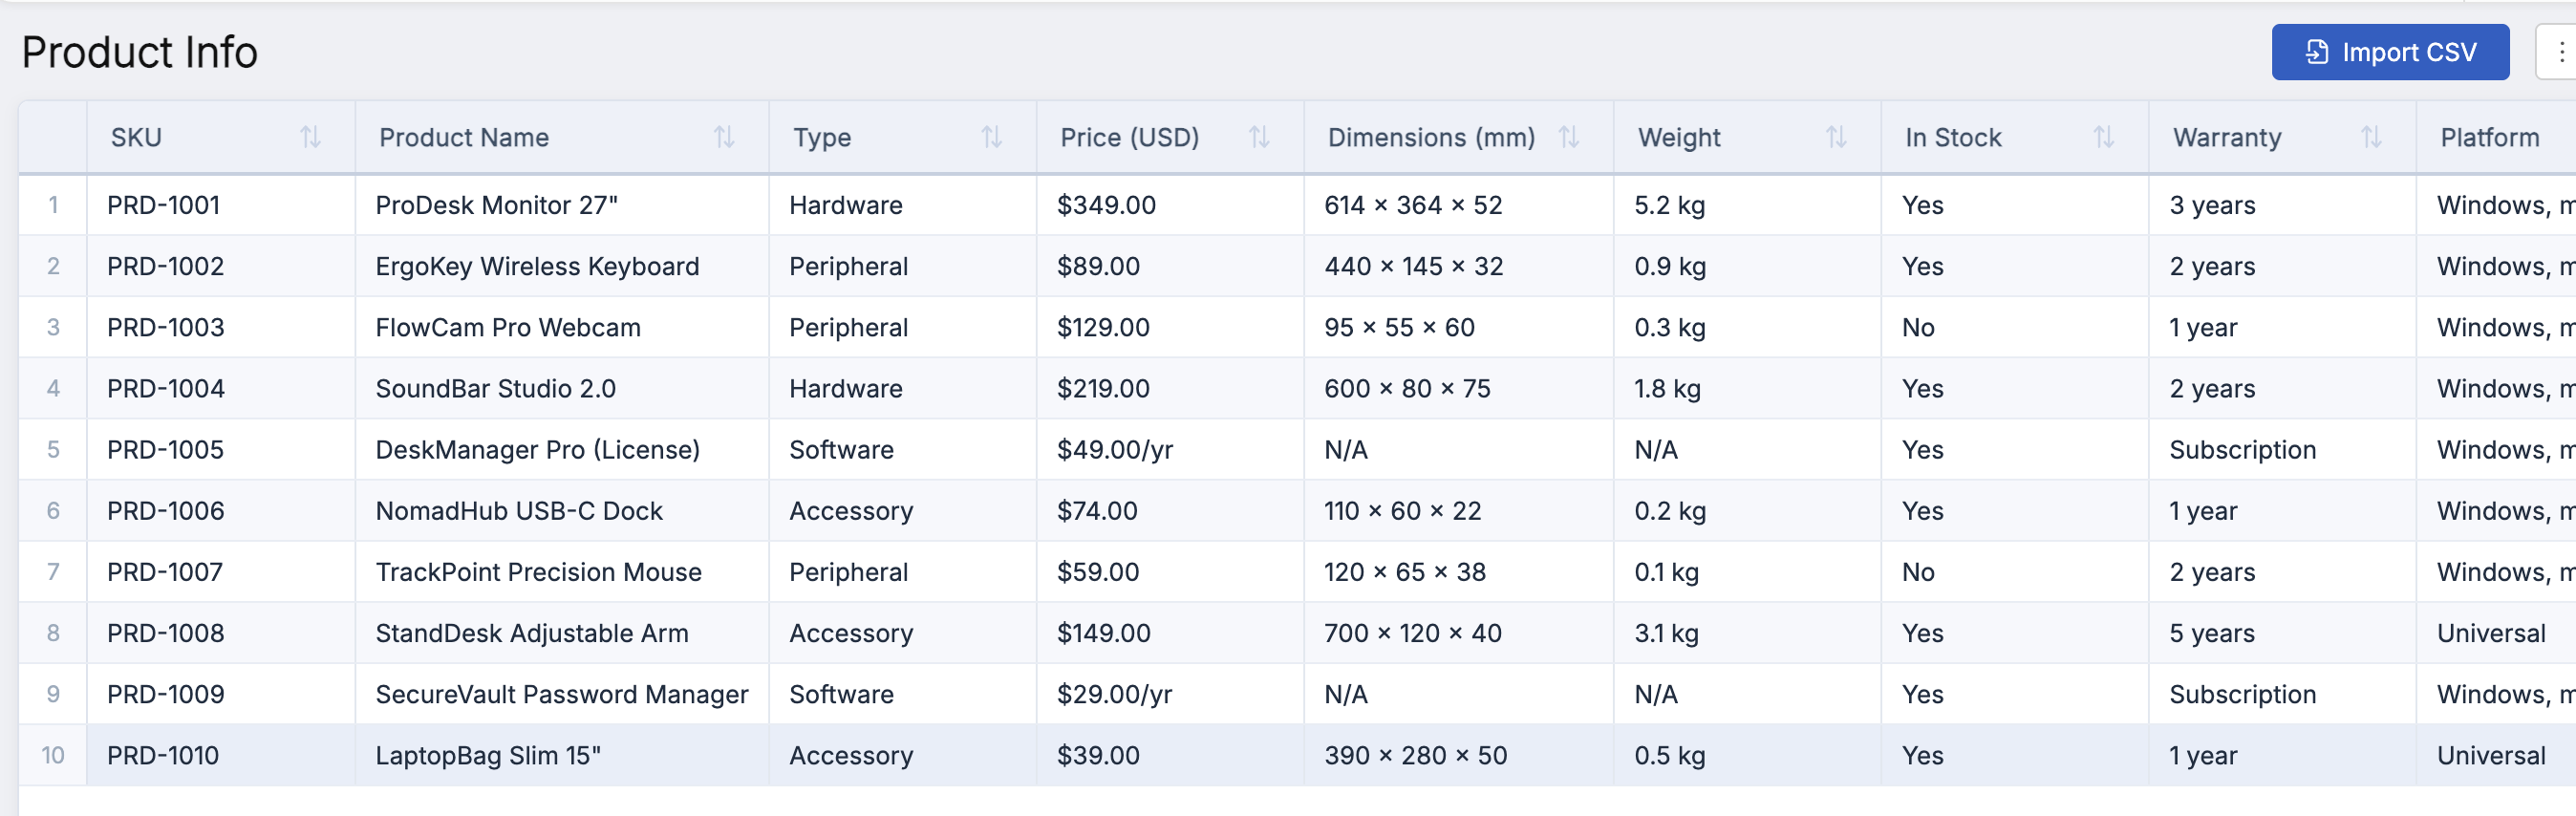
Once a table is created, populate it by importing a CSV file.
- Open the table from the Tables list page.
- Click Import CSV.
- Upload your CSV file or browse to select it.
Note: Only CSV files are supported. The maximum file size is 10 MB. The first row of the CSV must contain column headers — empty header rows and files with no data rows will fail validation.
After a successful import, the table opens directly showing all imported rows and columns. Click the sort control on any column header to sort that column in ascending or descending order.
Warning: Deleting a table that is actively referenced in a workflow will cause those workflow runs to fail. Before deleting a table, check all workflows that reference it by name or use it via a merge field. A confirmation modal will warn you if the table is currently associated with active workflows.

Using the Lookup Table Row action
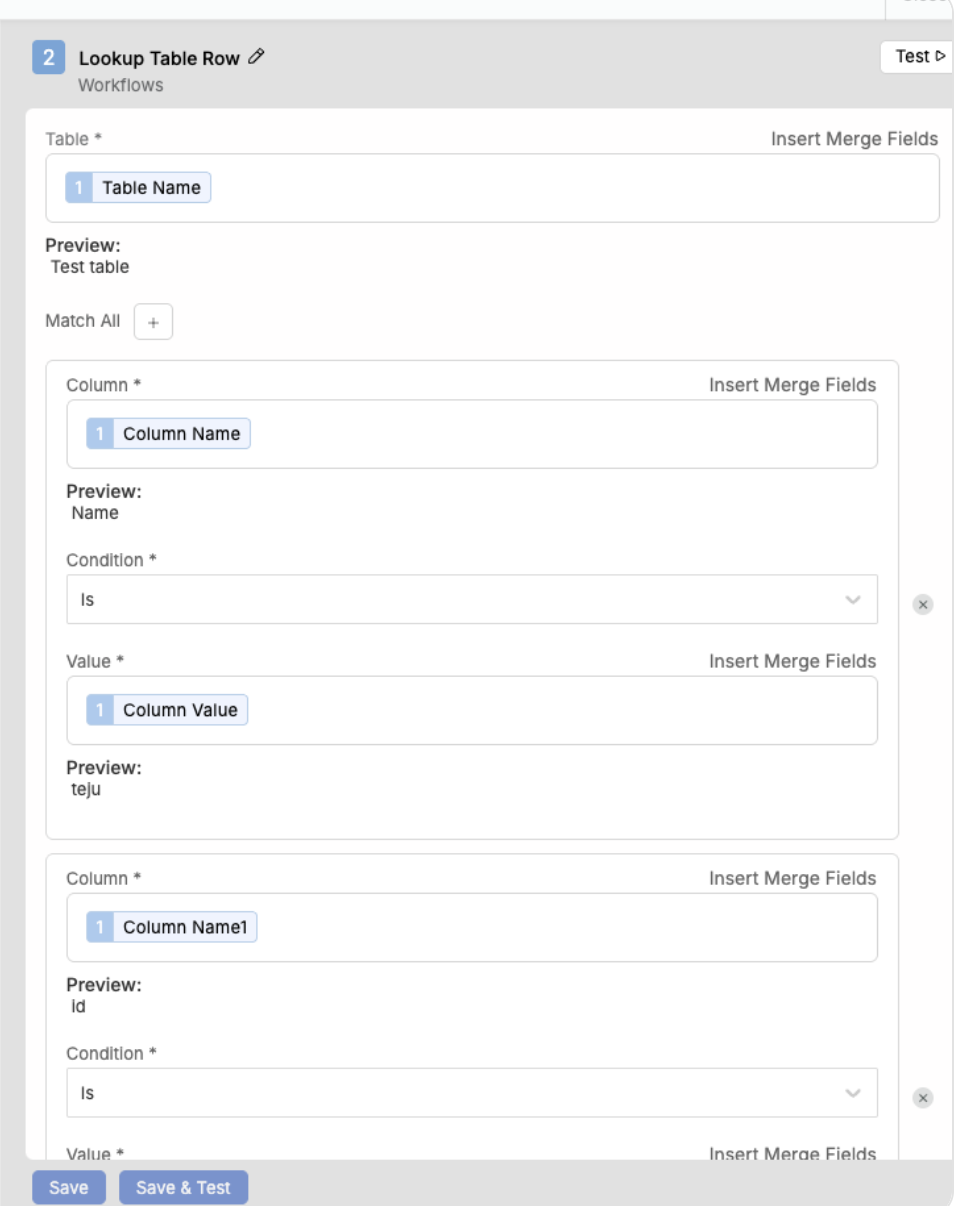
The Lookup Table Row action retrieves the first row from a table that matches one or more filter conditions you configure. The matched row's values are then available as merge fields in all subsequent actions in the workflow.
Configuring the action
- Open the workflow in the workflow builder and navigate to the step where you want to add the lookup.
- Click Add Action and select Lookup Table Row from the action list.
- In the Table field, enter the name of the table to query. You can also use Insert Merge Fields to reference a table name dynamically.
- Under Match All, click + to add a filter condition.
- In the Column field, enter the exact column header name from the table.
- In the Condition field, select Is.
- In the Value field, enter the value to match, or use Insert Merge Fields to pass a dynamic value from an earlier step.
- Repeat steps 4–7 to add additional filter conditions. All conditions use AND logic — the action returns only rows that match every condition.
- Click Save or Save & Test to validate the configuration.
Note: The Condition field currently supports Is only. Exact match is case-sensitive — ensure the value you pass matches the table data precisely.
Warning: If no row matches the configured filters at runtime, the action fails and the workflow stops at that step. The Run History entry for the action will show the error: No rows matched the given filters. To avoid unexpected failures, verify that the match values you pass are always present in the table.
Using the output in subsequent actions
When the Lookup Table Row action finds a match, each column value from the matched row becomes available as a merge field in all downstream actions. Merge fields are named using the format Row [column header] — for example, a column called Priority is available as Row Priority, and a column called Assignee Email is available as Row Assignee Email.
To insert a row value into a downstream action field, click Insert Merge Fields, expand the Lookup Table Row step, and select the column whose value you want to use.
Frequently asked questions
My Lookup Table Row action failed with "No rows matched the given filters." What should I check? Open the Run History entry for the failed run and select the Lookup Table Row step. Under Data In, check the value that was passed to the filter at runtime. Confirm that this value exists in the table and that the casing matches exactly. If the value comes from a merge field in a previous step, verify that the previous step returned the expected output.
Can I use a merge field to specify which table to query? Yes. The Table field supports Insert Merge Fields, so you can pass a table name dynamically from an earlier step or trigger field. Ensure the resolved value exactly matches an existing table name — if the table name cannot be found, the action fails.
What happens if I delete a table that a workflow is using? The workflow continues to run but the Lookup Table Row action fails at runtime because the referenced table no longer exists. A warning modal appears before deletion when the table is directly associated with an active workflow. For indirect references via merge fields, a general warning is shown — check all workflows manually before proceeding.
Can I update table data without rebuilding the workflow? Yes. You can re-import a CSV to update the table's data at any time. The workflow does not need to be edited — it references the table by name, so it picks up updated data automatically on the next run.
Your tables are now set up and available for use across any workflow in your HappyFox Workflows account. Next, use Run History to verify that your Lookup Table Row action is returning the expected row data and troubleshoot any filter mismatches.